During boot, Clevis runs on your computer and connects to a Tang server on your network to perform the unlocking. Most of the configuration is done on the Clevis side, as Tang servers are fairly standard. For a Tang server, I recommend Padhi’s Docker container. Just spawn it up, take note of your port and IP, and make sure to persist (and take care) the directory used as its database, as it serves as the key for your LUKS system.
For this setup to work, it’s important to install the encrypted system without encrypting the /boot partition. In this example, I install UEFI Arch Linux on the entire /dev/nvme0n1 (256GB) device, reserving 1GB for an unencrypted /boot partition. Then, I create an encrypted LUKS container with 8GB allocated for swap and the remaining space for the root (/) partition, without separating /home. We will divide the LUKS container into different partitions using an LVM2 setup.
At the end, it will look like this:
NAME           MAJ:MIN RM   SIZE RO TYPE  MOUNTPOINTS
nvme0n1        259:0    0 223.6G  0 disk
├─nvme0n1p1    259:1    0  1000M  0 part  /boot
└─nvme0n1p2    259:2    0 222.6G  0 part
  └─cryptroot  253:0    0 222.6G  0 crypt
    ├─vg0-swap 253:1    0     8G  0 lvm   [SWAP]
    └─vg0-root 253:2    0 214.6G  0 lvm   /
Here are the basic installation commands:
# 1. Verify UEFI models /sys/firmware/efi &&echo"UEFI boot!"# 2. Wipe the disk
wipefs -a /dev/nvme0n1
sgdisk --zap-all /dev/nvme0n1
# 3. Partition the disk
parted /dev/nvme0n1 -- mklabel gpt
parted /dev/nvme0n1 -- mkpart ESP fat32 1MiB 1001MiB
parted /dev/nvme0n1 --set 1 esp on
parted /dev/nvme0n1 -- mkpart primary 1001MiB 100%
# 4. Format the ESP as FAT32
mkfs.fat -F32 /dev/nvme0n1p1
# 5. Create and open LUKS2 container
cryptsetup luksFormat --type luks2 /dev/nvme0n1p2
cryptsetup open /dev/nvme0n1p2 cryptroot
# 6. Create LVM inside the LUKS device
pvcreate /dev/mapper/cryptroot
vgcreate vg0 /dev/mapper/cryptroot
lvcreate -L 8G vg0 -n swap
lvcreate -l 100%FREE vg0 -n root
# 7. Format and enable swap
mkfs.ext4 /dev/vg0/root
mkswap /dev/vg0/swap
# 8. Mount the filesystems
mount /dev/vg0/root /mnt
mkdir /mnt/boot
mount /dev/nvme0n1p1 /mnt/boot
swapon /dev/vg0/swap
# 9. Install base system
pacstrap /mnt base linux linux-firmware lvm2 grub efibootmgr
# 10. Generate fstab
genfstab -U /mnt >> /mnt/etc/fstab
# 11. Chroot into the system
arch-chroot /mnt
# 12. Set timezone and locale (example: São Paulo)ln-sf /usr/share/zoneinfo/America/Sao_Paulo /etc/localtime
hwclock --systohcecho"en_US.UTF-8 UTF-8">> /etc/locale.gen
locale-gen
echo"LANG=en_US.UTF-8"> /etc/locale.conf
echo"KEYMAP=br-abnt2"> /etc/vconsole.conf
# 13. Set hostnameecho myhostname > /etc/hostname
echo"127.0.0.1 localhost">> /etc/hosts
echo"::1 localhost">> /etc/hosts
echo"127.0.1.1 myhostname.localdomain myhostname">> /etc/hosts
# 14. Set root password
passwd
Then, before the first reboot, we start setting up the initramfs with networking, Clevis, LUKS, and LVM2. After that, we configure GRUB to work with this setup.
git clone https://aur.archlinux.org/yay.git
cd yay
makepkg -sicd ..
rm-rf yay
Install the mkinitcpio Clevis hook:
yay -S mkinitcpio-clevis-hook
Update /etc/mkinitcpio.conf for a Clevis + LUKS + LVM setup. Add curl and ip to BINARIES, and use the following order in HOOKS, highlighting net, clevis, encrypt, and lvm2:
The net hook is responsible for setting up networking during early boot.
Note: As pointed out in Jelle’s post (URL at the bottom), there’s no timeout in the net hook, so it won’t fall back to the encrypt hook if it fails. He recommends editing the /usr/lib/initcpio/hooks/net file and replacing the ipconfig call with ipconfig -t 30 "ip=${ip}".
Then, rebuild the initramfs:
mkinitcpio -P
Get the UUID of the encrypted partition:
blkid -s UUID -o value /dev/nvme0n1p2
You’ll need this UUID to configure GRUB. Edit /etc/default/grub so your GRUB_CMDLINE_LINUX looks like this (with your UUID, of course):
Note the ip=:::::eth0:dhcp part. While your network interface may have a different name, eth0 is commonly used during early boot. This setting is important to ensure network availability during the unlock process.
It will connect to the Tang server and ask for your LUKS password. If everything goes well, you can now reboot, and Clevis/Tang should handle unlocking your device automatically.
To exit and reboot:
exit
umount -R /mnt
swapoff -a
reboot
Thanks to Jelle van der Waa for his blog post, which pointed to the importance of the net initramfs hook, his post may also serve as a useful reference. Also, thanks to the author of this blog post, which I also used as a reference. Unfortunately, the website is now offline and I couldn’t get his name.
This text showcases a PoC on transmitting Secp256k1 elliptic-cuve encrypted digital text messages over frequency-modulated voice radio within the UHF spectrum, only for educational purposes. For modern and/or practical applications on the same band, please check LoRa, FSK and ASK.
In the past, a physical device (the modem) was needed in order to convert the digital signal into analog AX.25 packets (and vice versa). However, today we can find software-based modem implementations like Dire Wolf. Those allow us to perform RF AX.25 communications without any physical devices other than the radio units and their respective cables.
While SOURCE and DESTINATION are reserved for stations call signs, for the purposes of this PoC we’re going to use ALICE and BOB. The payload should be, in this case, the content of the secret-message-cipher.txt file.
Example:
ALICE>BOB:U2FsdGVkX1+mhD4zEq13II1kO7OBmPw [...]
The following command should instruct Dire Wolf’s gen_packets program to create a message-to-broadcast.wav file with the encrypted message modulated as AX.25 packets:
That file should now be transmitted over the radio. Fun fact: If you listen to it, it sounds just like a Dial-Up connection.
message-to-broadcast.wav file:
4. Transmit the .wav audio over FM UHF (Digital-to-Analog)
I’m going to use 1W TX power at the 462.587MHz (UHF) frequency, which is FRS’ Channel 2. And of course, the Baofeng uses narrow FM.
AFAIK, regulations-wise, AX.25 packets can not be sent within the FRS bands. However, I’m going to do it just for the sake of this demonstration. Moreover, here in my region all these channels are being used by all kinds of pirates, including digital. In some sense, I think this is good, as it maintains the hobby alive. And we all expect a lot of noise within UHF anyway. But here goes a formal disclaimer.
4.1. Warning
Before going any further, I must warn you that doing so might be illegal on your country. Please consult local regulations. Be sure to use the correct part of the spectrum and to use the correct power settings. Ideally, you should have a local license for transmitting.
With that, we continue.
4.2. Cable modification
Every Baofeng UV-5R comes with a PTT, microphone and speaker cable, just like this one:
I modified two of these cables, one to act as the TX cable and the other to act as the RX cable. However, if you are interested into full-duplex capabilities, you should modify your cables using the TX schematics (follows), which will support both TX and DX.
And I replaced both the microphone and the speaker with a p2-stereo male cable each. Even though the signal is mono, those were the pieces I had lying around, as most of this was made with recycled parts.
I also replaced the PTT button for a slightly bigger one.
4.2.2 RX Cable
Schematics:
4.4 Transmit
Here follows a simple diagram of what’s happening. (Original version)
The TX cable is connecting one UV-5R’s microphone to ALICE’s computer p2 audio output. The RX cable connects the other UV-5R’s speaker to BOB’s computer p2 line input. With the two radios turned on and tuned to the same frequency, BOB’s computer starts to record the audio signal from the line input. Then on ALICE, the PTT is pressed, and the message-to-broadcast.wav is played, which will be transmitted by the radio, then recorded by BOB’s computer.
5. Record the transmission at another station into a new .wav file (Analog-to-Digital)
On BOB’s computer, the recording results in a recorded-broadcast.wav file:
6. Convert the new recorded .wav back into the encrypted message string
Now we can use Dire Wolf’s atest program to demodulate it back into text:
$ atest recorded-broadcast.wav

44100 samples per second.  16 bits per sample.  2 audio channels.
1314816 audio bytes in file.  Duration = 7.5 seconds.
Fix Bits level = 0
Channel 0: 1200 baud, AFSK 1200 & 2200 Hz, E, 44100 sample rate.
Channel 1: 1200 baud, AFSK 1200 & 2200 Hz, E, 44100 sample rate.

DECODED[1] 0:03.587 ALICE audio level = 0(0/0)
[0] ALICE>BOB:U2FsdGVkX1+mhD4zEq13II1kO7OBmPw7UuPWnedqSSC+9jJ/aXCFm6kF8bEtyBa0 4WUOk0Bawux+jKvQmSRRKvWNaRwdlTaWsZJyx9lWEqbubVY3FFWDCJ6L5A3K3kg6


1 from v1.wav
1 packets decoded in 0.093 seconds.  80.6 x realtime
Having an USB webcam connected to a Raspberry Pi 4, we’re going to use FFmpeg to securely (SSL and secret-key authentication) stream its video and audio (with CCTV-style timestamps) to a containerized NGINX server over RTMP/RTMPS protocol, and then use this same server to broadcast the stream to multiple users using both Apple HLS and MPEG-Dash. Users will be able to watch the stream on the browser, Android, iOS, Linux, Windows and MacOS.
This is useful if you’re willing to have any video source (file or live feed) streaming on the internet or network, maybe also host the stream on your own website (embedded as HTML) to display public events/places, all-sky-cameras, CCTV, science experiments, etc. Or anything that won’t match with some of the major streaming platform policies. Or something that’s designed to broadcast 24/7. The cases are numerous. Whatever the use-case be, I have applied here simple but efficient methods to limit who can stream, who can watch and also to end-to-end encrypt everything. In this article I’m going to demonstrate how I configured it all using common “of-the-shelf” tools, and I hope this helps you.
But before we begin, note that using this configuration I’m experiencing about 50 seconds of delay between what’s recorded and what’s played with all devices communicating over a 54mpbs Wifi network. But the biggest bottleneck I assume it’s NGINX processing the stream.
Preparing the NGINX Server
The most important part of this setup is the NGINX server. This server is going to receive the media stream from the Raspberry Pi, decrypt it, authenticate and serve it as both HLS and Dash. However NGINX won’t support RTMP media stream by default, we’ll have to compile it with the RTMP module. This process is straight-forward but tedious, so I’ve built a Docker image to do that for us. In case you want to do it manually for some reason you can follow the commands of the Dockerfile:
For you to set this container up, first clone the Docker image repository:
Now you will need Docker and Docker Compose installed on your machine. Installing them is pretty simple, so take a minute to do so if you don’t have them already.
Build the image:
$ docker-compose build broadcaster
And spawn up the NGINX server:
$ docker-compose up broadcaster
The server is now ready to accept streams and to start broadcasting them.
This will leave NGINX running attached to the 4080, 4443, 4080 and 4936 ports on the Docker host machine. Check the repository documentation for more information on those ports. Or better yet, take a look at the nginx.conf file:
You can change this file as you see fit, just be sure to check the “Warnings” section of the repository documentation.
As you can see on the nginx.conf, we have a rudimentar secret-key based authentication. It’s enough for the purpose of this article and for the most simple usage of media streaming. Mind though that it only makes sense to use this authentication over SSL/TLS encryption, because the keys will be sent as plain text otherwise.
The configuration also describes a SSL and a plain-text endpoint for each connection. So you can choose between encrypted and unencrypted on all steps.
Sending webcam audio and video to the NGINX server
Now that the server is up and running, we need to SSH into the Raspberry Pi (or any computer with an USB webcam). In my case the Pi has a generic USB webcam connected to it. Our goal is to find this webcam device and to use FFmpeg to start a RTPM and RTPMS audio/video stream to the NGINX server over the network. Be sure to have FFmpeg installed on your Pi/computer, this should be simple to do.
Also mind that here I’m going to be describing steps for a Linux computer. Although FFmpeg is multi-platform, the way the video data input is harvested may change depending on the OS. I’m going to use Video4Linux. On the repository README.md you will find a more simple example for streaming .mp4 files.
This output tells me that /dev/video0 is the webcam.
This webcam have a built-in microphone and we also want to stream the audio, so we need to find its audio interface:
$ arecord -L

null
    Discard all samples (playback) or generate zero samples (capture)
samplerate
    Rate Converter Plugin Using Samplerate Library
speexrate
    Rate Converter Plugin Using Speex Resampler
jack
    JACK Audio Connection Kit
oss
    Open Sound System
pulse
    PulseAudio Sound Server
speex
    Plugin using Speex DSP (resample, agc, denoise, echo, dereverb)
upmix
    Plugin for channel upmix (4,6,8)
vdownmix
    Plugin for channel downmix (stereo) with a simple spacialization
default
    Default ALSA Output (currently PulseAudio Sound Server)
usbstream:CARD=Headphones
    bcm2835 Headphones
    USB Stream Output
sysdefault:CARD=WEBCAM
    GENERAL WEBCAM, USB Audio
    Default Audio Device
front:CARD=WEBCAM,DEV=0
    GENERAL WEBCAM, USB Audio
    Front output / input
usbstream:CARD=WEBCAM
    GENERAL WEBCAM
    USB Stream Output
It’s the one set as the default: sysdefault:CARD=WEBCAM.
We also need to discover the supported resolutions for the webcam:
I think 1280x720 is a good choice for this experiment.
Now a quick side note: I decided to play with webcam streaming to help me in a weather project for astronomy data acquisition, so for me a CCTV-style timestamp and the ability to write text on the video was essential. Luckily FFmpeg has it all covered (check the drawtext option on the next command).
As my laptop’s network IP (running the NGINX) is 192.168.1.192, this is how I composed my RTMPS webcam streaming with in-video timestamps, from the Raspberry Pi:
Note the rtmps:192.168.1.192:4936/live/cam1?streamkey=5f3e32f3bad0 address, sending the RTMPS to the NGINX server.
Be sure to read the repository README.md to learn more about the address format and the stream-key.
After running it, the RPi4 is already streaming the webcam audio and video to the NGINX server.
Watching it: HLS or MPEG-Dash?
Many articles go deep into the difference between the two. My take is that unless you have a reason, use MPEG-Dash over HLS, as it’s newer and “smart” enough to adapt the video quality to match the viewer’s connection bandwidth.
So from now on in this article I’m going to be covering only MPEG-Dash examples. If you want to know how to watch HLS, check the repository documentation.
Watching the stream on VLC (Windows, Linux and MacOS)
If you have VLC installed, you can open it and press Ctrl + n or Cmd + n. On the network address input, enter:
Replace 192.168.1.192 with your NGINX server address.
Hit enter, accept the certificate issue (it’s a self signed SSL certificate) and wait for the stream to begin:
Watching the stream on mobile (Android and iOS)
For that any MPEG-Dash (and HLS) compatible mobile client will work. I don’t have an iOS device here to test, but I’m sure there’s plenty of clients to choose. For Android I’m going to use the ExpressPlayer.
For some reason this app does not implement HTTPS (shame!), so I’m going to use HTTP in this example.
Open the app, select “CUSTOM INPUT”, then on “Media/MS3 URL …” add:
Watching the stream on the web (Google Chrome, Firefox, etc.)
There are two ways I know of for playing MPEG-Dash on browsers: Dash.js and Google’s Shaka Player, both JavaScript implementations.
Here I’m going to display Google’s Shaka in action.
Also, as we’re using a self signed certificate, Shaka will complain about not being able to verify the authority, so here too we’ll need to use HTTP instead of HTTPS. But this should be fixed if ever on production, as proper certificates will be used.
constmanifestUri='http://192.168.1.192:4080/dash/bbb.mpd?watchkey=16356b9f';functioninitApp(){shaka.polyfill.installAll();if(shaka.Player.isBrowserSupported()){initPlayer();}else{console.error('Browser not supported.');}}asyncfunctioninitPlayer(){constvideo=document.getElementById('video');constplayer=newshaka.Player(video);window.player=player;player.addEventListener('error',onErrorEvent);try{awaitplayer.load(manifestUri);}catch(e){onError(e);}}functiononErrorEvent(event){onError(event.detail);}functiononError(error){console.error('Error code',error.code,'object',error);}document.addEventListener('DOMContentLoaded',initApp);
And it works like a charm, it’s the best player I’ve tested so far.
Bonus: We don’t need NGINX for a single viewer
If your goal is to have a single computer consuming the video stream, eg.: RPi sends webcam video to a desktop computer to be recorded. Then you don’t need a NGINX server, you can stream directly from the RPi to the desktop computer using just FFmpeg and VLC over the much simpler RTP protocol.
Some comments on that:
You will need to decide between playback or record, I failed to perform both on VLC without crashing.
The record-and-play delay is a lot smaller, around 10 seconds on my setup.
Note that I’m pointing to the Desktop machine even though there’s no server running there. rtp://192.168.1.155:5000?ttl=2. I’ve also chosen the port 5000, but that’s up to you.
Now, on the Desktop computer open VLC and press Ctrl + n or Cmd + n to open the network stream dialog. And on the address input enter: rtp://192.168.1.155:5000. Then press Enter to start watching the stream.
That’s correct, we’re entering the same IP of the Desktop computer. That’s the computer which is receiving the stream.
That’s it
Video streaming is definitely fun. I can see many projects where this will be useful. I’m also feeling happy after learning how to set up these configurations and I hope you have enjoyed it as well. Feel free to contact me if you’re facing issues or just if you want to chat.
While onboarding on a new project I ended up needing to build a Docker image for legacy versions of both Ruby and Node.js, more specifically Ruby 2.4.0 and Node.js 9.9.0. Unable to find good instructions on how to do so, I decided to write my own.
I saw two options here, one was to start from Ruby 2.4.0 official image and then install Node 9.9.0 on it; The other was the contrary, to start with Node and install Ruby. I’ve opted for the latter as I’m more familiar with the manual Ruby setup. So I’ll be starting from the image node:9.9.0-alpine.
I’ve looked both into RVM and asdf as version manager options for Ruby, really trying to ease out the Ruby installation process, but further inspection revealed that neither were built with containers in mind, it gets funky to try to set them up on a Alpine container. Not impossible, but funky. Manually compiling Ruby proved to be much easier to me, so I’m going this path.
So the steps would be:
Install system dependencies.
Use bash as the default shell (optional).
Download, compile and install Ruby 2.4.0 source code.
This post was originally published on my old blog dedicated to amateur astronomy.
Recently I was working at my office when I noticed a light beam that wasn’t there on the previous days. I knew it was going to get bigger during the next days, so I decided to record it for a few weeks, plot a chart and make some calculations out of it, just for fun.
In total 14 days were recorded, but not in a 14-day time span. The first picture was taken August 20th and the last on September 12th. The missing pictures relates to days in which the weather was blocking the beam to be visible.
I used a fixed metric ruler on the wall and took a picture every day roughly at the same time (4:30pm).
It changed every day. Not only the beam size was getting bigger but the “furthest” and “nearest” point were both moving to the left. This chart plots the evolution:
sunlight.data<-read.csv(file="~/sunlight_experiment.csv")sunlight.data$taken_at<-as.POSIXct(sunlight.data$taken_at,format="%Y-%m-%dT%H:%M",tz="America/Maceio")sunlight.data$size<-(sunlight.data$ends-sunlight.data$starts)ggplot(sunlight.data,aes(x=taken_at))+labs(title="Sunlight beam projection over a few weeks")+geom_line(aes(y=starts,color="darkred"))+geom_line(aes(y=ends,color="darkblue"))+geom_line(aes(y=size,color="darkgreen"))+scale_color_discrete(name="Labels",labels=c("Furthest Point","Beam Size","Nearest Point"))+xlab("Date")+ylab("Line Point (cm)")
I also wrote a super simple Elixir program to compute the growth average for these values:
According to Wakatime I took 1 hour and 33 minutes to write this one:
And the results are:
The “nearest point” moved to the left with a average speed of 1.34cm per day.
The “furthest point” moved to the left with a average speed of 1.84cm per day.
The “beam size” grew about 0.5cm per day.
I made the calculations using only the first 8 days, as they were separated with a almost precise 24h interval. This whole thing was a proof of concept for a later iteration of this experiment. The amount of data and the lack of precision yielded funky numbers, but this was expected in some sense. I think the overall outcome of this experiment is positive, I feel ready to start processing some more serious data.
And of course, that’s the beam on the first day, August 20th:
I’ve been using Linkerd for a while on staging environments, but now I finally deployed it to production. And I went to inspect its CPU/memory footprint on my older Prometheus/Grafana setup. The Kubernetes cluster for production is 3-node-sized with 2GB RAM each and it’s running at DigitalOcean. After a whole day since the initial setup (which is really simple) the result is what follows.
CPU at node 1/3 (with annotations)
CPU at node 1/3
CPU at node 2/3
CPU at node 3/3
My reports on memory usage
This Kubernetes cluster is basically running a dozen BEAM instances in production (we’re running a few Elixir APIs). That makes my reports on memory kinda useless due to the way that the BEAM manages its memory. At the end of the day, the memory usage of my containers is tightly related with how long they’re running.
But if you want to see them anyway, here they are:
For long I’ve been playing with Kubernetes in production environments, at my job and in other projects. But everything was done using managed solutions like the one from Digital Ocean, which is great by the way. But I was willing to put a bit of my hands on it.
I happen to have a desktop computer (i5 8400 16GB RAM running Manjaro) which I’m not using that much, so I planned to setup a VM on it and run a single node Kubernetes cluster myself. But wait a second, for that we had Minikube, right? Yes, the problem being it’s designed to work inside your own computer and not to have contact with the external world, not even your local network. I was having trouble to make that work when I remembered about K3s, which is a Kubernetes distribution that’s actually simpler than Minikube, it’s great and it’s also production ready.
One of the key things here is that I wanted to take advantage of Intel’s Vt-d and KVM for virtualization. Also I want this VM to get its own IP address on my local network, so to my router it would appear as another physical machine. For that I’m going to create a bridge network interface between the host and the VM.
Before we start, mind that all the work here will be made in my Manjaro laptop, named skywitch a.k.a. “laptop”, connecting via SSH to the Manjaro bare metal desktop server, redwitch a.k.a “the host” (The SSH setup was already in place). I want to be able to connect to the K3s from skywitch and also to access its running services from the outside world. Which will need some port-forwarding at the internet router firmware. (K3s already comes with Traefik as an Ingress resource)
For the VM OS I’m going to choose Ubuntu Server 18.04 and its hostname will be named warlock.
All the servers, redwitch and warlock will have static IPv4 address on the local network. All other devices, including my laptop will be using DHCP.
Here’s how it’s going to look like after finished:
You can ignore the HDMI KVM Switch device for the purpose of this guide.
And just to make things clear, here’s the /etc/hosts I’ve setup to my skywitch laptop:
Another important thing is that here in Brazil is common for residential connections to lack a static external IP address, but to have a dynamic one that changes each restart. In my case my address changes depending on the route to the server, so I can be talking to Spotify as one address and to YouTube as other, you never know, but they all point to me. Plus the ports 80 and 443 are blocked to the external world, so people can not serve web pages without having to explicitly use a port like :8080 in the URL.
And that means two things:
I’m going to need some sort of Dynamic DNS tool (remember no-ip?), in this case Cloudflare will be the choice, as it provides this service for private domain names with no cost.
The router port-forwarding step must account for having the ports 80 and 443 blocked.
I’m going to assume you already have a server with a KVM setup and Vt-d enabled. So I’m not going to cover this process here, this can be easily found on Google. But if you’re wondering, here is one of those guides.
So the plan is:
Setup a bridge network interface on the host.
Create a Ubuntu 18.04 VM on the host with the bridged network.
Set up a K3s single node Kubernetes cluster into the VM.
Describing a Dynamic DNS cronJob into the cluster to update a domain name in Cloudflare with the external IP address.
Configuring the router to forward certain ports to the VM.
Deploying a simple application to the cluster and have it exposed to the world.
So let’s start.
Just a quick note: Many of the stuff presented here was taken from other guides on the web, which you can find all listed at the end of this post.
Setup a bridge network interface on the host
This will allow us to create a VM that will receive its own IP on our local network, pretty much as every other physical device does.
First install bridge-utils, it will come in handy later:
$ sudo pacman -S bridge-utils
Now you need to find out the name of your main network interface, which can be done with $ ip link show or $ ifconfig. In my case it was named enp0s31f6.
You’re also going to need to know the connection gateway and DNS addresses.
In my case they’re the same, but it may differ from vendor to vendor, I’m not sure.
You should also pick up a static IP address for the host machine, I’m going to choose 192.168.1.151. Plus I’m going to name the bridge interface as br1.
And that’s it. You can use $ brctl show and $ bridge link to check bridges and see bridged interfaces respectively. But for now I think we’re good. Our host now have a new source for its static IP (192.168.1.151) and a bridge network interface on it. Great.
Create a Ubuntu 18.04 VM on the host with the bridged network
Boot a VM - virsh start <vm>
Stop a VM - virsh shutdown <vm>
Suspend a VM - virsh suspend <vm>
Delete a VM - virsh destroy <vm> and virsh undefine <vm>
We’re going to use a Shell script in order to create and configure the VM. So create a create_vm.sh file:
$ vi ~/create_vm.sh
With:
#!/bin/shif[-z"$1"];then
echo Specify a virtual-machine name.
exit 1
fi
sudo virt-install \--name$1\--ram 4096 \--diskpath=/home/fschuindt/hdd_repo/libvirt/images/$1.img,size=30 \--vcpus 4 \--os-type linux \--os-variant ubuntu18.04 \--network bridge:br1,model=virtio \--graphics none \--console pty,target_type=serial \--location'http://archive.ubuntu.com/ubuntu/dists/bionic-updates/main/installer-amd64/'\--extra-args'console=ttyS0,115200n8 serial'
Here you shall stop and perform some editing in the file. A few things to look after are the RAM size, the number of CPUs and the --disk path, which mine is pointing to /home/fschuindt/hdd_repo/libvirt/images/ with a 30GB sized disk.
This directory on my host is on a 2TB HDD mount, it’s important you have it mapped to a physical device or to a place where you have enough space to install the VM. I just allocated 30GB, but that’s arbitrary. Just mind that this space will be actually occupied during the VM creation.
Also the --network bridge:br1,model=virtio part shall point to the br1 bridge interface we’ve created earlier in the guide.
Save and:
$ chmod +x create_vm.sh

$ ./create_vm.sh warlock
Where warlock is the name of the VM.
Now the S.O. installation will begin, the Ubuntu setup is pretty straight forward so you must complete it with no problem. Just mind tho, at the “Software selection” phase to pick up the OpenSSH server.
After finished the installation, it will reboot and end the process.
Let’s connect via SSH to the freshly installed VM, for that, find the VM IP using:
sudo nmap -sP 192.168.1.0/24
It will have the port 22 (OpenSSH) opened. In my case it was 192.168.1.12.
Edit with your username (fschuindt for me) and it will ask you for the password you’ve set during installation. A good thing to do now is to set a static IP to the VM.
Edit the file /etc/netplan/01-netcfg.yml with:
# warlock VM# This file describes the network interfaces available on your system# For more information, see netplan(5).network:version:2renderer:networkdethernets:enp1s0:dhcp4:noaddresses:[192.168.1.161/24]gateway4:192.168.1.1nameservers:addresses:[1.1.1.1,1.0.0.1]
I’m using my local values for gateway, I’m setting Cloudflare DNS as my DNS servers (1.1.1.1 and 1.0.0.1) and the VM local static IP to 192.168.1.161.
To apply just:
$ sudo netplan apply
You will get disconnected from the SSH session, but that’s ok, just connect again with the new IP. Better yet, add it to your /etc/hosts file with your VM name, as I showed in the beginning.
Now we have a virtual Ubuntu 18.04 running with a static IP on our local network. Let’s do some work in it.
Set up a K3s single node Kubernetes cluster into the VM
There’s nothing much to say in this section really, K3s installation and usage is really simple, I recommend checking their homepage and the docs for a quick start. But here’s the basic:
This is inside the VM.
To install:
$ curl -sfL https://get.k3s.io | sh -
This will also configure systemd, so K3s will start after every reboot.
To get the admin .yaml file:
$ sudo cat /etc/rancher/k3s/k3s.yaml
I’m going to save this on my laptop’s ~/.kube/. Saving it named as config connects your kubectl with the new cluster.
Now our single node K3s cluster is up and running, you can already start playing with kubectl. The next steps are really for exposing it to the world, so if you don’t want that you can declare work done =]. Otherwise we still have some more stuff to do.
Describing a Dynamic DNS cronJob into the cluster to update a domain name in Cloudflare with the external IP address
So I plan to expose services running on the K3s cluster to the outside world. If I had a static external IP address that would be great, but as you may already know it’s not the case. But it’s still possible to have a domain name pointed to the server as a Dynamic DNS (DDNS) using one DDNS provider like no-ip.com and DynDNS. That requires a DDNS client running on my system checking changes on the external IP and updating it against the provider.
The provider will be Cloudflare, as it’s not only a DNS provider but also supports DDNS. I own the 722.network domain name on Cloudflare and I’m going to use the subdomain fschuindt.722.network to point to the cluster.
The client will be ddclient, a well known DDNS client written in Perl. I’ve setup a ddclient public Docker image that you can configure and use for that same matter. For using it I’m going to set up a Kubernetes cronJob that every 5 minutes will spawn a container using that image and run a DDNS check/update command, then exits and waits to the next execution, and so on.
It’s not perfect but it’s enough, that shall keep the subdomain name updated.
So if you will, create a ddclient-job.yml file:
apiVersion:v1kind:ConfigMapmetadata:name:ddclient-config-maplabels:owner:ddclientdata:LOGIN:"[email protected]"PASSWORD:"your-cloudflare-global-api-key"ZONE_DOMAIN:"your-domain.com"ZONE_HOSTNAME_1:"your-host.your-domain.com"ZONE_HOSTNAME_2:"other-host.your-domain.com"ZONE_HOSTNAME_3:""ZONE_HOSTNAME_4:""ZONE_HOSTNAME_5:""ZONE_HOSTNAME_6:""ZONE_HOSTNAME_7:""ZONE_HOSTNAME_8:""ZONE_HOSTNAME_9:""ZONE_HOSTNAME_10:""---apiVersion:batch/v1beta1kind:CronJobmetadata:name:ddclient-joblabels:owner:ddclientspec:concurrencyPolicy:ForbidfailedJobsHistoryLimit:5successfulJobsHistoryLimit:5startingDeadlineSeconds:60# At every 5th minute.schedule:"*/5****"jobTemplate:metadata:name:ddclient-joblabels:owner:ddclientspec:activeDeadlineSeconds:240backoffLimit:3template:metadata:name:ddclient-job-podlabels:owner:ddclientspec:containers:-name:ddclient-job-containerimage:zfschuindt/ddclient:latestcommand:["bash","-c","/ddclient/entrypoint.sh"]envFrom:-configMapRef:name:ddclient-config-maprestartPolicy:OnFailure
And edit it to fit your needs. Especially the ConfigMap section, where you want to provide your Cloudflare credentials with the domain/subdomain names. I’ve created space for up to 10 subdomains, but if you want more you can easily edit the entrypoint.sh file of the image.
Now someone is working to keep my external IP updated on the fschuindt.722.network domain name. Wonderful!
Configuring the router to forward certain ports to the VM
This part changes for everyone. It’s really dependent on which internet router vendor/model you have, but in general the concept is the same: Let the router to know which static IP address on the local network is to forward incoming connections on given ports.
If skipped, the outside world won’t be able to connect to the services on the cluster, as the router won’t know what to do with those connections, it must deliver it to some device on the network, but without knowing which it drops it.
For configuring this you need to access your router firmware interface, for me it’s on http://192.168.1.1/ for any wire-connected device on the network. Then you must provide credentials and look for any “port forward” option.
You can find the default user/password combination for your router as well as instructions for port forwarding (if it supports) on the PDF manual for your router model (every model has one, just check online).
For me I added two entries on the port-forwarding rules list. One forwarding every external connection on the port 7222 to the port 80 on the 192.168.1.161 (the warlock VM) and other forwarding every external connection on the port 7223 to the port 443 on the same server, the 192.168.1.161 (warlock VM).
It’s looking like this:
And that will let the router know to which device to send the incoming connections. One more thing to do, let’s deploy a service to the K3s and test the whole thing.
Deploying a simple application to the cluster and have it exposed to the world
This will be done at the skywitch laptop, connected to cluster using kubectl.
Right now we have only one DNS pointing to the cluster, which is fschuindt.722.network. I’m going to deploy a service to operate on this address, more precisely a Ingress resource.
The service we’re going to deploy is a simple HTTP “ping/pong” echo. It serves only one route GET /ping, which will reply 200 OK, "pong". I wrote this service using Elixir and it’s on GitHub here: https://github.com/fschuindt/http_echo
It already comes with its own Dockerfile and its image is publicly available at DockerHub. Plus if you check the /k8s folder on the repository you will find a group of Kubernetes resources for deploying it into Kubernetes. This will make everything easier.
The resources are:
config_map.yml
service.yml
ingress.yml
deployment.yml
Important: The files in the repository are just examples and may differ a bit from the ones presented here.
And we’re going to create them in this order, so the ConfigMap first:
Notice here I’m also setting the echo.warlock.network domain name to be used within the local network, I’m going to add this hostname on my laptop’s /etc/hosts as well.
And that shall make the http://fschuindt.722.network:72222/ping available and serving the HTTP echo service to the world. :)
It may be already offline by the time you’re reading this, but believe me, it worked.
And that’s how my Kubernetes Dashboard looks like:
By the way, if you want to install this dashboard on your cluster, check how to do it here.
And with that we shall have our residential K3s cluster running and serving to the outside world on top of a fast and optimized virtualization method. I hope this guide have served you well, setting up this environment brought me new ideas for residential server setups and was a lot of fun!
By the way, if you haven’t already wondered, after the term 1474 it crashes:
That’s because Erlang’s math module operates only with numbers that can be represented with floating points, and such a big number can’t.
But anyway, my goal here isn’t to calculate Fibonacci at all.
I’m just wanting to see Elixir’s power doing hundreds of those big number calculations at the same time.
I want to give Elixir a sequential integer list, in this case from 1 to 1474, which is the apparent limit. Then ask it to spawn a Erlang process for each one of those elements. Each process should receive the element and return the result of its FibonacciCalculus.of(n), being n the element.
I should end up with a unordered result, as reflect of the concurrent computation.
So, I’ve described the module:
defmoduleConcurrentFibonaccidodefstartdoconcurrent_map(1..1474,fn(x)->"Fibonacci of #{x} is: #{FibonacciCalculus.of(x)}"end)enddefconcurrent_map(list,func)dolist|>Enum.map(fne->spawn(fn->IO.putsfunc.(e)end)end)endend
And the result is beautiful:
A simple code and it executes more than 1400 concurrent processes in less than a blink of an eye.
Also the unordered result is evident:
[...]
Fibonacci of 1456 is: 8.640108610267577e303
Fibonacci of 1455 is: 5.3398807876359814e303
Fibonacci of 1457 is: 1.397998939790356e304
Fibonacci of 1458 is: 2.262009800817114e304
Fibonacci of 1460 is: 5.922018541424584e304
Fibonacci of 1465 is: 6.567619203443404e305
Fibonacci of 1470 is: 7.28360130920199e306
In an attempt to go deeper, instead of using the 1..1474 list, I’m using the following function:
This will repeat the 1..1474 list approximately 7x, to result in a list containing 10.000 elements.
Let’s see how it goes:
You can see it takes more time, obviously.
But let’s think about it. It’s ten thousand concurrent executions, ten thousand processes.
I have even tested with 100.000 processes, in my 4GB RAM [email protected] notebook it takes 5.47 seconds. One hundred thousand processes in 5 seconds.
I have to say I’m impressed.
I’m about one year playing with Elixir in my spare time, it’s a really fun language, especially if you never programmed functional before.
This is a off blog’s topic, but I just released a new Ruby gem.
The gem firebase_id_token was developed to easily verify Firebase ID Token signatures in Ruby back-end environments. It uses Redis to store Google’s x509 certificates, which helps other processes in your application to access it really fast.
The Firebase ID Token is really a JWT. What the gem does is to check if the token was made for your application and if it’s valid, both in it’s parameters and in it’s RSA signature.
Also referred as SICP, it’s a well known MIT book published in the late 80’s and used in the Computer Science and Electrical Engineering courses. Written by Harold Abelson, Gerald Jay Sussman and Julie Sussman. It’s the definitive functional programming book.
It’s available for free in many formats such as HTML and PDF. This book insipred me to create this blog. It’s just wonderful, it’s the great grimoire of computer wizardry. But not only that, the MIT OpenCourseWare has the whole video lectures from 1986 taught by Harold Abelson and Gerald Jay Sussman themselves, and with no cost.
These twenty video lectures by Hal Abelson and Gerald Jay Sussman are a complete presentation of the course, given in July 1986 for Hewlett-Packard employees, and professionally produced by Hewlett-Packard Television. These videos are also available here under a Creative Commons license compatible with commercial use.
Note: These lectures follow the first edition (1985) of Structure and Interpretation of Computer Programs. Many of the programs discussed were rewritten for the second edition (1996) of the book, and new material was added. These video lectures will still be useful for students using the second edition, since the overall themes of the course and order of presentation are unchanged.
These videos are courtesy of Hal Abelson and Gerald Jay Sussman, and are used with permission.
The book uses the language Scheme which is a Lisp dialect, one of the oldest languages (1959) to teach pure functional concepts from the very basics to the more complex cases. It’s like learning to program again from a pure functional perspective.
This course introduces students to the principles of computation. Upon completion of 6.001, students should be able to explain and apply the basic methods from programming languages to analyze computational systems, and to generate computational solutions to abstract problems. Substantial weekly programming assignments are an integral part of the course. This course is worth 4 Engineering Design Points.
And here’s the first lecture, just in case:
Course Citation and License
Eric Grimson, Peter Szolovits, and Trevor Darrell. 6.001 Structure and Interpretation of Computer Programs. Spring 2005. Massachusetts Institute of Technology: MIT OpenCourseWare, https://ocw.mit.edu. License: Creative Commons BY-NC-SA.
While studying the Elixir Getting Started Guide I decided to begin resuming it out as a way to get it fixed. I ended up with a very useful document for those who already read the guide and want to quickly review any topic. It’s a one page document resuming the whole guide, which is just great to use with the Find command.
I basically copied, slightly altered and omitted great part of the content to focus on things I thought more important (to me). But provides a quick explanation of everything. Also includes some notes I made.
As this post still serve as a study resource, it’s constantly updated.
When “counting” the number of elements in a data structure, Elixir also abides by a simple rule: the function is named size if the operation is in constant time (i.e. the value is pre-calculated) or length if the operation is linear (i.e. calculating the length gets slower as the input grows).
String concatenation is done with: <>.
Operators or, and, not can only accept boolean values. Besides these boolean operators, Elixir also provides ||, && and ! which accept arguments of any type. For these operators, all values except false and nil will evaluate to true.
The variable _ is special in that it can never be read from. Trying to read from it gives an unbound variable error.
Guard Clauses are neat:
# Anonymous functions can have guard clauses:# They also apply to the 'case' statement, 'when'.iex>f=fn...>x,ywhenx>0->x+y...>x,y->x*y...>end#Function<12.71889879/2 in :erl_eval.expr/5>iex>f.(1,3)4iex>f.(-1,3)-3
Basic Types
Booleans
All good, just true and false. Nothing special.
Atoms
Pretty much like Lisp’s Atoms, A.K.A. Symbols in Ruby.
Anonymous Functions
Anonymous Functions (function literal, lambda abstraction) is delimited between fn and end.
# first class citizens (can be passed as arguments)iex>add=fna,b->a+bendiex>add.(3,2)
Anonymous functions are closures and as such they can access variables that are in scope when the function is defined.
Lists
Describes itself.
# Add or subtract using ++ or --iex>[2,23,42,11,true]iex>list=[1,2,3]# Get head and tail.iex>hd(list)1iex>tl(list)[2,3]
When Elixir sees a list of printable ASCII numbers, Elixir will print that as a char list (literally a list of characters).
Single-quotes are char lists, double-quotes are strings.
Tuples
Similar to lists, but stored in memory, all data is availible with no recursion needed.
Accessing the length of a list is a linear operation: we need to traverse the whole list in order to figure out its size. Updating a list is fast as long as we are prepending elements.
Tuples, on the other hand, are stored contiguously in memory. This means getting the tuple size or accessing an element by index is fast. However, updating or adding elements to tuples is expensive because it requires copying the whole tuple in memory.
When “counting” the number of elements in a data structure, Elixir also abides by a simple rule: the function is named size if the operation is in constant time (i.e. the value is pre-calculated) or length if the operation is linear (i.e. calculating the length gets slower as the input grows).
Pattern Matching
The match operator is not only used to match against simple values, but it is also useful for destructuring more complex data types. For example, we can pattern match on tuples:
Behavious pretty much as the classic case statement.
iex>case{1,2,3}do...>{4,5,6}->...>"This clause won't match"...>{1,x,3}->...>"This clause will match and bind x to 2 in this clause"...>_->...>"This clause would match any value"...>end
If you want to pattern match against an existing variable, you need to use the ^ operator:
Another cool example, now with clauses conditions:
iex>case{1,2,3}do...>{1,x,3}whenx>0->...>"Will match"...>_->...>"Would match, if guard condition were not satisfied"...>end
If none of the clauses match, an error is raised.
cond
case is useful when you need to match against different values. However, in many circumstances, we want to check different conditions and find the first one that evaluates to true. In such cases, one may use cond.
iex>conddo...>2+2==5->...>"This will not be true"...>2*2==3->...>"Nor this"...>1+1==2->...>"But this will"...>end
This is equivalent to else and if clauses in many imperative languages.
If none of the conditions return true, an error is raised. For this reason, it may be necessary to add a final condition, equal to true, which will always match.
if and unless
Are useful when you need to check for just one condition, also pro provides a else statement.
iex>iftruedo...>"This works!"...>end"This works!"iex>unlesstruedo...>"This will never be seen"...>endnil
do / end blocks
Equivalent to { / }, it’s also possible things like:
iex>iffalse,do::this,else::that
# Expressions like:iex>is_numberiftruedo...>1+2...>end**(CompileError)undefinedfunction:is_number/2# Should be:iex>is_number(iftruedo...>1+2...>end)true
Binaries, strings and char lists
Binaries and bitstrings
You can define a binary using <<>>. It’s just a sequence of bytes. The string concatenation operation is actually a binary concatenation operator <>.
A common trick in Elixir is to concatenate the null byte <<0>> to a string to see its inner binary representation:
A binary is a bitstring where the number of bits is divisible by 8. Smaller bit are just bitstrings!
A string is a UTF-8 encoded binary, and a binary is a bitstring where the number of bits is divisible by 8.
Char lists
A char list is nothing more than a list of characters.
Char list contains the code points of the characters between single-quotes (note that IEx will only output code points if any of the chars is outside the ASCII range). So while double-quotes represent a string (i.e. a binary), single-quotes represents a char list (i.e. a list).
Keywords and maps
Keyword list
It’s a associative data structure. In Elixir, when we have a list of tuples and the first item of the tuple (i.e. the key) is an atom, we call it a keyword list:
It’s the default mechanism for passing options to functions in Elixir.
Only allows Atoms as keys.
Ordered as specified by the developer.
Remember, though, keyword lists are simply lists, and as such they provide the same linear performance characteristics as lists. The longer the list, the longer it takes to read from. For bigger data use maps instead.
Maps
Whenever you need a key-value store, maps are the “go to” data structure in Elixir:
We have a keyword list of users where each value is a map containing the name, age and a list of programming languages each user likes. If we wanted to access the age for john, we could write:
iex>users[:john].age27
It happens we can also use this same syntax for updating the value:
The update_in/2 macro is similar but allows us to pass a function that controls how the value changes. For example, let’s remove “Clojure” from Mary’s list of languages:
There is more to learn about put_in/2 and update_in/2, including the get_and_update_in/2 that allows us to extract a value and update the data structure at once. There are also put_in/3, update_in/3 and get_and_update_in/3 which allow dynamic access into the data structure. Check their respective documentation in the Kernel module for more information.
Modules
In Elixir we group several functions into modules.
This will generate a file named Elixir.Math.beam containing the bytecode for the defined module. If we start iex again, our module definition will be available (provided that iex is started in the same directory the bytecode file is in).
Elixir projects are usually organized into three directories:
ebin - contains the compiled bytecode
lib - contains elixir code (usually .ex files)
test - contains tests (usually .exs files)
When working on actual projects, the build tool called mix will be responsible for compiling and setting up the proper paths for you.
Scripted mode
.ex - files to be compiled
.exs - files to run in scripted mode (Learning purposes)
Executing:
$elixirmath.exs
Named functions
def/2 - defines a function
defp/2 - defines a private function
Function declarations also support guards and multiple clauses. If a function has several clauses, Elixir will try each clause until it finds one that matches.
Similar to constructs like if, named functions support both do: and do/end block syntax, as we learned do/end is just a convenient syntax for the keyword list format. For example, we can edit math.exs to look like this:
&List.flatten(&1, &2) is the same as writing fn(list, tail) -> List.flatten(list, tail) end which in this case is equivalent to &List.flatten/2. You can read more about the capture operator & in the Kernel.SpecialForms documentation.
Here we have used recursion to traverse a list, doubling each element and returning a new list. The process of taking a list and mapping over it is known as a map algorithm.
Recursion and tail call optimization are an important part of Elixir. However, when programming in Elixir you will rarely use recursion as above. The Enummodule, (next chapter), already provides many conveniences for working with lists. For instance, the examples above could be written as:
The Enum module provides a huge range of functions to transform, sort, group, filter and retrieve items from enumerables. It is one of the modules developers use frequently in their Elixir code.
For specific operations, like inserting and updating particular elements, you may need to reach for modules specific to the data type. For example, if you want to insert an element at a given position in a list, you should use the List.insert_at/3 function from the List module.
We say the functions in the Enum module are polymorphic because they can work with diverse data types. In particular, the functions in the Enum module can work with any data type that implements the Enumerable protocol.
All the functions in the Enum module are eager. Many functions expect an enumerable and return a list back. This means that when performing multiple operations with Enum, each operation is going to generate an intermediate list until we reach the result:
The |> symbol used in the snippet above is the pipe operator: it simply takes the output from the expression on its left side and passes it as the first argument to the function call on its right side. It’s similar to the Unix | operator.
Streams
As an alternative to Enum, Elixir provides the Stream module which supports lazy operations:
In the example above, 1..100_000 |> Stream.map(&(&1 * 3)) returns a data type, an actual stream, that represents the map computation over the range 1..100_000. Furthermore, they are composable because we can pipe many stream operations:
Instead of generating intermediate lists, streams build a series of computations that are invoked only when we pass the underlying stream to the Enum module. Streams are useful when working with large, possibly infinite, collections.
It also provides functions for creating streams. For example, Stream.cycle/1 can be used to create a stream that cycles a given enumerable infinitely:
iex>stream=Stream.cycle([1,2,3])#Function<15.16982430/2 in Stream.cycle/1>iex>Enum.take(stream,10)[1,2,3,1,2,3,1,2,3,1]
Another interesting function is Stream.resource/3 which can be used to wrap around resources, guaranteeing they are opened right before enumeration and closed afterwards, even in the case of failures. For example, we can use it to stream a file:
iex>stream=File.stream!("path/to/file")#Function<18.16982430/2 in Stream.resource/3>iex>Enum.take(stream,10)
The example above will fetch the first 10 lines of the file you have selected. This means streams can be very useful for handling large files or even slow resources like network resources.
Processes
In Elixir, all code runs inside processes. Processes are isolated from each other, run concurrent to one another and communicate via message passing.
spawn
The basic mechanism for spawning new processes is with the auto-imported spawn/1 function:
When a message is sent to a process, the message is stored in the process mailbox. The receive/1 block goes through the current process mailbox searching for a message that matches any of the given patterns. receive/1 supports guards and many clauses, such as case/2.
If there is no message in the mailbox matching any of the patterns, the current process will wait until a matching message arrives. A timeout can also be specified (A timeout of 0 can be given when you already expect the message to be in the mailbox):
iex>receivedo...>{:hello,msg}->msg...>after...>1_000->"nothing after 1s"...>end"nothing after 1s"
Let’s put it all together and send messages between processes:
iex>parent=self()#PID<0.41.0>iex>spawnfn->send(parent,{:hello,self()})end#PID<0.48.0>iex>receivedo...>{:hello,pid}->"Got hello from #{inspectpid}"...>end"Got hello from #PID<0.48.0>
While in the shell, you may find the helper flush/0 quite useful. It flushes and prints all the messages in the mailbox.
iex>sendself(),:hello:helloiex>flush():hello:ok
Links
The most common form of spawning in Elixir is actually via spawn_link/1. Before we show an example with spawn_link/1, let’s try to see what happens when a process fails:
iex>spawnfn->raise"oops"end#PID<0.58.0>[error]Process#PID<0.58.00> raised an exception**(RuntimeError)oops:erlang.apply/2
It merely logged an error but the spawning process is still running. That’s because processes are isolated. If we want the failure in one process to propagate to another one, we should link them. This can be done with spawn_link/1:
iex>spawn_linkfn->raise"oops"end#PID<0.41.0>**(EXITfrom#PID<0.41.0>) an exception was raised:**(RuntimeError)oops:erlang.apply/2
In Elixir applications, we often link our processes to supervisors which will detect when a process dies and start a new process in its place. This is only possible because processes are isolated and don’t share anything by default. And since processes are isolated, there is no way a failure in a process will crash or corrupt the state of another.
While other languages would require us to catch/handle exceptions, in Elixir we are actually fine with letting processes fail because we expect supervisors to properly restart our systems. “Failing fast” is a common philosophy when writing Elixir software!
spawn/1 and spawn_link/1 are the basic primitives for creating processes in Elixir. Although we have used them exclusively so far, most of the time we are going to use abstractions that build on top of them. Let’s see the most common one, called tasks.
Tasks
Tasks build on top of the spawn functions to provide better error reports and introspection:
iex(1)>Task.startfn->raise"oops"end{:ok,#PID<0.55.0>}15:22:33.046[error]Task#PID<0.55.0> started from #PID<0.53.0> terminating**(RuntimeError)oops(elixir)lib/task/supervised.ex:74:Task.Supervised.do_apply/2(stdlib)proc_lib.erl:239::proc_lib.init_p_do_apply/3Function:#Function<20.90072148/0 in :erl_eval.expr/5>Args:[]
Instead of spawn/1 and spawn_link/1, we use Task.start/1 and Task.start_link/1 to return {:ok, pid} rather than just the PID. This is what enables Tasks to be used in supervision trees. Furthermore, Task provides convenience functions, like Task.async/1 and Task.await/1, and functionality to ease distribution.
State
We haven’t talked about state so far in this guide. If you are building an application that requires state, for example, to keep your application configuration, or you need to parse a file and keep it in memory, where would you store it?
Processes are the most common answer to this question. We can write processes that loop infinitely, maintain state, and send and receive messages. As an example, let’s write a module that starts new processes that work as a key-value store in a file named kv.exs:
At first, the process map has no keys, so sending a :get message and then flushing the current process inbox returns nil. Let’s send a :put message and try it again:
Notice how the process is keeping a state and we can get and update this state by sending the process messages. In fact, any process that knows the pid above will be able to send it messages and manipulate the state.
It is also possible to register the pid, giving it a name, and allowing everyone that knows the name to send it messages:
Using processes around state and name registering are very common patterns in Elixir applications. However, most of the time, we won’t implement those patterns manually as above, but by using one of the many abstractions that ship with Elixir. For example, Elixir provides agents, which are simple abstractions around state:
A :name option could also be given to Agent.start_link/2 and it would be automatically registered. Besides agents, Elixir provides an API for building generic servers (called GenServer), tasks and more, all powered by processes underneath. Those, along with supervision trees, will be explored with more detail in the Mix and OTP guide which will build a complete Elixir application from start to finish.
IO and the file system
The IO module is the main mechanism in Elixir for reading and writing to standard input/output (:stdio), standard error (:stderr), files and other IO devices. Usage of the module is pretty straightforward:
iex>IO.puts"hello world"helloworld:okiex>IO.gets"yes or no? "yesorno?yes"yes\n"
By default, functions in the IO module read from the standard input and write to the standard output. We can change that by passing, for example, :stderr as an argument (in order to write to the standard error device):
iex>IO.puts:stderr,"hello world"helloworld:ok
The File module
The File module contains functions that allow us to open files as IO devices. By default, files are opened in binary mode, which requires developers to use the specific IO.binread/2 and IO.binwrite/2 functions from the IO module:
A file can also be opened with :utf8 encoding, which tells the File module to interpret the bytes read from the file as UTF-8-encoded bytes.
It also provides Unix like functions: File.rm/1, File.mkdir/1, File.mkdir_p/1, etc. (Checkout the module documentation) Notice the variations with a trailing bang !.
Notice that when the file does not exist, the version with ! raises an error. The version without ! is preferred when you want to handle different outcomes using pattern matching:
caseFile.read(file)do{:ok,body}-># do something with the `body`{:error,reason}-># handle the error caused by `reason`end
However, if you expect the file to be there, the bang variation is more useful as it raises a meaningful error message. Avoid writing: {:ok, body} = File.read(file) as, in case of an error, File.read/1 will return {:error, reason} and the pattern matching will fail. You will still get the desired result (a raised error), but the message will be about the pattern which doesn’t match (thus being cryptic in respect to what the error actually is about).
Therefore, if you don’t want to handle the error outcomes, prefer using File.read!/1.
The Path module
The majority of the functions in the File module expect paths as arguments. Most commonly, those paths will be regular binaries. The Path module provides facilities for working with such paths:
By modelling IO devices with processes, the Erlang VM allows different nodes in the same network to exchange file processes in order to read/write files in between nodes. Of all IO devices, there is one that is special to each process: the group leader.
When you write to :stdio, you are actually sending a message to the group leader, which writes to the standard-output file descriptor:
The group leader can be configured per process and is used in different situations. For example, when executing code in a remote terminal, it guarantees messages in a remote node are redirected and printed in the terminal that triggered the request.
alias, require and import
# Alias the module so it can be called as Bar instead of Foo.BaraliasFoo.Bar,as:Bar# Ensure the module is compiled and available (usually for macros)requireFoo# Import functions from Foo so they can be called without the `Foo.` prefiximportFoo# Invokes the custom code defined in Foo as an extension pointuseFoo
We are going to explore them in detail now. Keep in mind the first three are called directives because they have lexical scope , while use is a common extension point.
alias
defmoduleMathdoaliasMath.List,as:Listend
From now on, any reference to List will automatically expand to Math.List. In case one wants to access the original List, it can be done by prefixing the module name with Elixir.:
Note that like the alias directive, require is also lexically scoped.
import
We use import whenever we want to easily access functions or macros from other modules without using the fully-qualified name. For instance, if we want to use the duplicate/2 function from the List module several times, we can import it:
:except could also be given as an option.import also supports :macros and :functions to be given to :only. For example, to import all macros, one could write: import Integer, only: :macros.
Note that import is lexically scoped too. This means that we can import specific macros or functions inside function definitions:
Note that importing a module automatically requires it.
use
Although not a directive, use is a macro tightly related to require that allows you to use a module in the current context. The use macro is frequently used by developers to bring external functionality into the current lexical scope, often modules.
For example, in order to write tests using the ExUnit framework, a developer should use the ExUnit.Case module:
They serve to annotate the module, often with information to be used by the user or the VM.
They work as constants.
They work as a temporary module storage to be used during compilation.
As annotations
Elixir has a handful of reserved attributes. Here are a few of them, the most commonly used ones:
@moduledoc - provides documentation for the current module.
@doc - provides documentation for the function or macro that follows the attribute.
@behaviour - (notice the British spelling) used for specifying an OTP or user-defined behaviour.
@before_compile - provides a hook that will be invoked before the module is compiled. This makes it possible to inject functions inside the module exactly before compilation.
Note:Unlike Erlang, user defined attributes are not stored in the module by default. The value exists only during compilation time. A developer can configure an attribute to behave closer to Erlang by calling Module.register_attribute/3.
Every time an attribute is read inside a function, a snapshot of its current value is taken. In other words, the value is read at compilation time and not at runtime.
As temporary storage
Attributes can be used to do so. The ExUnit framework which uses module attributes as annotation and storage:
When using the update syntax (|), the VM is aware that no new keys will be added to the struct, allowing the maps underneath to share their structure in memory.
Structs can also be used in pattern matching, both for matching on the value of specific keys as well as for ensuring that the matching value is a struct of the same type as the matched value.
Note:Structs are bare maps underneath. As maps, structs store a “special” field named __struct__ that holds the name of the struct. We referred to structs as bare maps because none of the protocols implemented for maps are available for structs. For example, you can neither enumerate nor access a struct. However, since structs are just maps, they work with the functions from the Map module.
Structs alongside protocols provide one of the most important features for Elixir developers: data polymorphism.
Protocols
Protocols are a mechanism to achieve polymorphism in Elixir. Dispatching on a protocol is available to any data type as long as it implements the protocol.
Let’s implement that to specify a blank? protocol that returns a boolean for other data types that should be considered blank.
defprotocolBlankdo@doc"Returns true if data is considered blank/empty"defblank?(data)end
The protocol expects a function called blank? that receives one argument to be implemented. We can implement this protocol for different Elixir data types as follows:
# Integers are never blankdefimplBlank,for:Integerdodefblank?(_),do:falseend# Just empty list is blankdefimplBlank,for:Listdodefblank?([]),do:truedefblank?(_),do:falseend# Just empty map is blankdefimplBlank,for:Mapdo# Keep in mind we could not pattern match on %{} because# it matches on all maps. We can however check if the size# is zero (and size is a fast operation).defblank?(map),do:map_size(map)==0end# Just the atoms false and nil are blankdefimplBlank,for:Atomdodefblank?(false),do:truedefblank?(nil),do:truedefblank?(_),do:falseend
And we would do so for all native data types. The types available are:
Atom
BitString
Float
Function
Integer
List
Map
PID
Port
Reference
Tuple
Manually implementing protocols for all types can quickly become repetitive and tedious. In such cases, Elixir provides two options: we can explicitly derive the protocol implementation for our types or automatically implement the protocol for all types. In both cases, we need to implement the protocol for Any.
Another alternative to @derive is to explicitly tell the protocol to fallback to Any when an implementation cannot be found. This can be achieved by setting @fallback_to_any to true in the protocol definition:
# Map a list of integers into their squared values.iex>forn<-[1,2,3,4],do:n*n[1,4,9,16]
A comprehension is made of three parts: generators, filters and collectables.
Generators and filters
In the expression above, n <- [1, 2, 3, 4] is the generator. It is literally generating values to be used in the comprehension. Any enumerable can be passed in the right-hand side of the generator expression:
Comprehensions also allow multiple generators and filters to be given. Here is an example that receives a list of directories and gets the size of each file in those directories:
A more advanced example of multiple generators and filters is Pythagorean triples. A Pythagorean triple is a set of positive integers such that a*a + b*b = c*c, let’s write a comprehension in a file named triple.exs:
Is one of the mechanisms provided by the language for working with textual representations (also allowing extensibility). Sigils start with the tilde (~) character which is followed by a letter (which identifies the sigil) and then a delimiter; optionally, modifiers can be added after the final delimiter.
The most common sigil in Elixir is ~r, which is used to create regular expressions:
# A regular expression that matches strings which contain "foo" or "bar":iex>regex=~r/foo|bar/~r/foo|bar/iex>"foo"=~regextrueiex>"bat"=~regexfalse
So far, all examples have used / to delimit a regular expression. However sigils support 8 different delimiters:
The ~s sigil is used to generate strings, like double quotes are. The ~s sigil is useful, for example, when a string contains both double and single quotes:
iex>~s(this is a string with "double" quotes, not 'single' ones)"this is a string with \"double\" quotes, not 'single' ones"
Char lists
iex>~c(this is a char list containing 'single quotes')'this is a char list containing \'single quotes\''
Word lists (words are just regular strings)
iex>~w(foo bar bat)["foo","bar","bat"]
The ~w sigil also accepts the c, s and a modifiers (for char lists, strings and atoms, respectively), which specify the data type of the elements of the resulting list:
iex>~w(foo bar bat)a[:foo,:bar,:bat]
Interpolation and escaping in sigils
Besides lowercase sigils, Elixir supports uppercase sigils to deal with escaping characters and interpolation.
iex>~s(String with escape codes \x26 #{"inter" <> "polation"})"String with escape codes & interpolation"iex>~S(String without escape codes \x26 without #{interpolation})"String without escape codes \\x26 without \#{interpolation}"
The following escape codes can be used in strings and char lists:
\" – double quote
\' – single quote
\\ – single backslash
\a– bell/alert
\b – backspace
\d - delete
\e - escape
\f - form feed
\n – newline
\r – carriage return
\s – space
\t – tab
\v – vertical tab
\0 - null byte
\xDD - represents a single byte in hexadecimal (such as \x13)
\uDDDD and \u{D...} - represents a Unicode codepoint in hexadecimal (such as \u{1F600})
Also supports herecods:
iex>~s"""
...> this is
...> a heredoc string
...> """
Writing escape characters in documentation would soon become error prone because of the need to double-escape some characters. By using ~S, this problem can be avoided altogether:
We can also provide our own sigils by implementing functions that follow the sigil_{identifier} pattern. For example, let’s implement the ~i sigil that returns an integer (with the optional n modifier to make it negative):
Sigils can also be used to do compile-time work with the help of macros. For example, regular expressions in Elixir are compiled into an efficient representation during compilation of the source code, therefore skipping this step at runtime. If you’re interested in the subject, we recommend you learn more about macros and check out how sigils are implemented in the Kernel module (where the sigil_* functions are defined).
try, catch and rescue
Errors
Errors (or exceptions) are used when exceptional things happen in the code. A sample error can be retrieved by trying to add a number into an atom:
You can also define your own errors by creating a module and using the defexception construct inside it; this way, you’ll create an error with the same name as the module it’s defined in. The most common case is to define a custom exception with a message field:
In Elixir, we avoid using try/rescue because we don’t use errors for control flow. We take errors literally: they are reserved for unexpected and/or exceptional situations. In case you actually need flow control constructs, throws should be used. That’s what we are going to see next.
Throws
In Elixir, a value can be thrown and later be caught. throw and catch are reserved for situations where it is not possible to retrieve a value unless by using throw and catch.
Those situations are quite uncommon in practice except when interfacing with libraries that do not provide a proper API. For example, let’s imagine the Enum module did not provide any API for finding a value and that we needed to find the first multiple of 13 in a list of numbers:
Since Enumdoes provide a proper API, in practice Enum.find/2 is the way to go:
iex>Enum.find-50..50,&(rem(&1,13)==0)-39
Exits
All Elixir code runs inside processes that communicate with each other. When a process dies of “natural causes” (e.g., unhandled exceptions), it sends an exit signal. A process can also die by explicitly sending an exit signal:
iex>trydo...>exit"I am exiting"...>catch...>:exit,_->"not really"...>end"not really"
Using try/catch is already uncommon and using it to catch exits is even more rare.
After
Sometimes it’s necessary to ensure that a resource is cleaned up after some action that could potentially raise an error. The try/after construct allows you to do that. For example, we can open a file and use an after clause to close it–even if something goes wrong:
iex>{:ok,file}=File.open"sample",[:utf8,:write]iex>trydo...>IO.writefile,"olá"...>raise"oops, something went wrong"...>after...>File.close(file)...>end**(RuntimeError)oops,somethingwentwrong
Sometimes you may want to wrap the entire body of a function in a try construct, often to guarantee some code will be executed afterwards. In such cases, Elixir allows you to omit the try line:
defmoduleLousyCalculatordo@typedoc"""
Just a number followed by a string.
"""@typenumber_with_remark::{number,String.t}@specadd(number,number)::number_with_remarkdefadd(x,y),do:{x+y,"You need a calculator to do that?"}@specmultiply(number,number)::number_with_remarkdefmultiply(x,y),do:{x*y,"It is like addition on steroids."}end
Custom types defined through @type are exported and available outside the module they’re defined in:
If you want to keep a custom type private, you can use the @typep directive instead of @type.
Static code analysis
Typespecs are not only useful to developers and as additional documentation. The Erlang tool Dialyzer, for example, uses typespecs in order to perform static analysis of code. That’s why, in the QuietCalculator example, we wrote a spec for the make_quiet/1 function even if it was defined as a private function.
Behaviours
Behaviours provide a way to:
Define a set of functions that have to be implemented by a module;
Ensure that a module implements all the functions in that set.
Modules adopting the Parser behaviour will have to implement all the functions defined with the @callback directive. As you can see, @callback expects a function name but also a function specification like the ones used with the @spec directive we saw above.
As you grow more proficient in Elixir, you may want to explore the Erlang STDLIB Reference Manual in more detail. Check below some of the most widely used libraries.
The binary module
The built-in Elixir String module handles binaries that are UTF-8 encoded. The binary module is useful when you are dealing with binary data that is not necessarily UTF-8 encoded.
Formatted text output
Elixir does not contain a function similar to printf found in C and other languages. Luckily, the Erlang standard library functions :io.format/2 and :io_lib.format/2 may be used. The first formats to terminal output, while the second formats to an iolist. The format specifiers differ from printf, refer to the Erlang documentation for details.
The crypto module
The crypto module contains hashing functions, digital signatures, encryption and more:
The :crypto module is not part of the Erlang standard library, but is included with the Erlang distribution. This means you must list :crypto in your project’s applications list whenever you use it. To do this, edit your mix.exs file to include.
The digraph module
The digraph module (as well as digraph_utils) contains functions for dealing with directed graphs built of vertices and edges. After constructing the graph, the algorithms in there will help finding for instance the shortest path between two vertices, or loops in the graph.
Erlang Term Storage
The modules ets and dets handle storage of large data structures in memory or on disk respectively.
ETS lets you create a table containing tuples. By default, ETS tables are protected, which means only the owner process may write to the table but any other process can read. ETS has some functionality to be used as a simple database, a key-value store or as a cache mechanism.
The functions in the ets module will modify the state of the table as a side-effect.
iex>table=:ets.new(:ets_test,[])# Store as tuples with {name, population}iex>:ets.insert(table,{"China",1_374_000_000})iex>:ets.insert(table,{"India",1_284_000_000})iex>:ets.insert(table,{"USA",322_000_000})iex>:ets.i(table)<1>{"USA",322000000}<2>{"China",1_374_000_000}<3>{"India",1_284_000_000}
The math module
The math module contains common mathematical operations covering trigonometry, exponential and logarithmic functions.
The queue module
The queue is a data structure that implements (double-ended) FIFO (first-in first-out) queues efficiently:
Cover picture: The Banquet in the Pine Forest (1482/3) is the third painting in Sandro Botticelli’s series The Story of Nastagio degli Onesti, which illustrates events from the Eighth Story of the Fifth Day. (Public Domain)


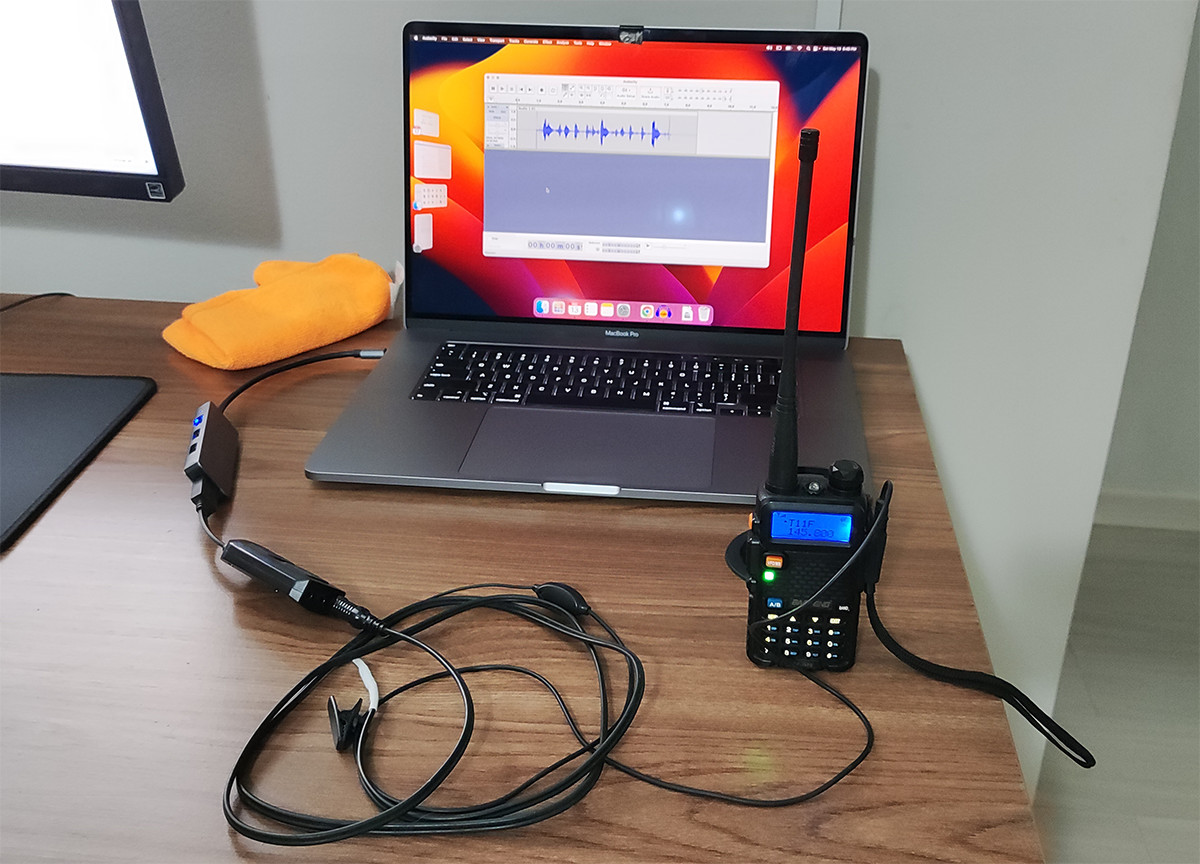


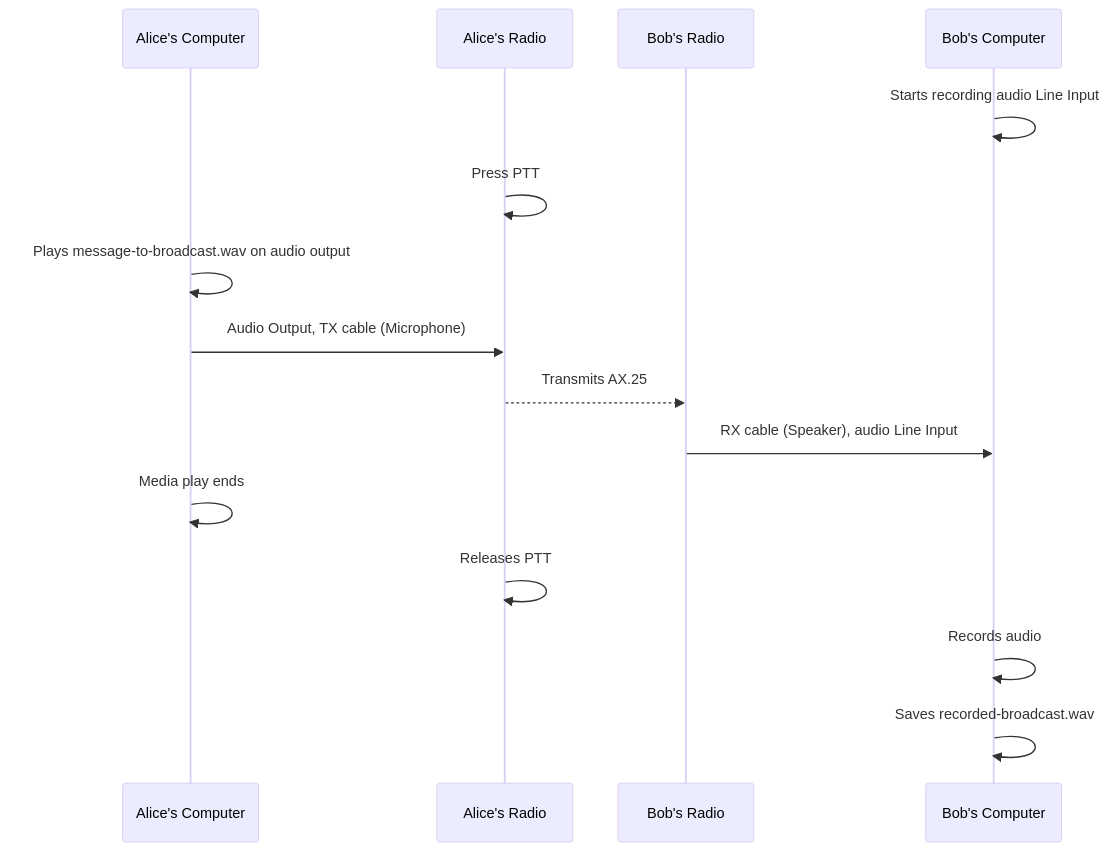

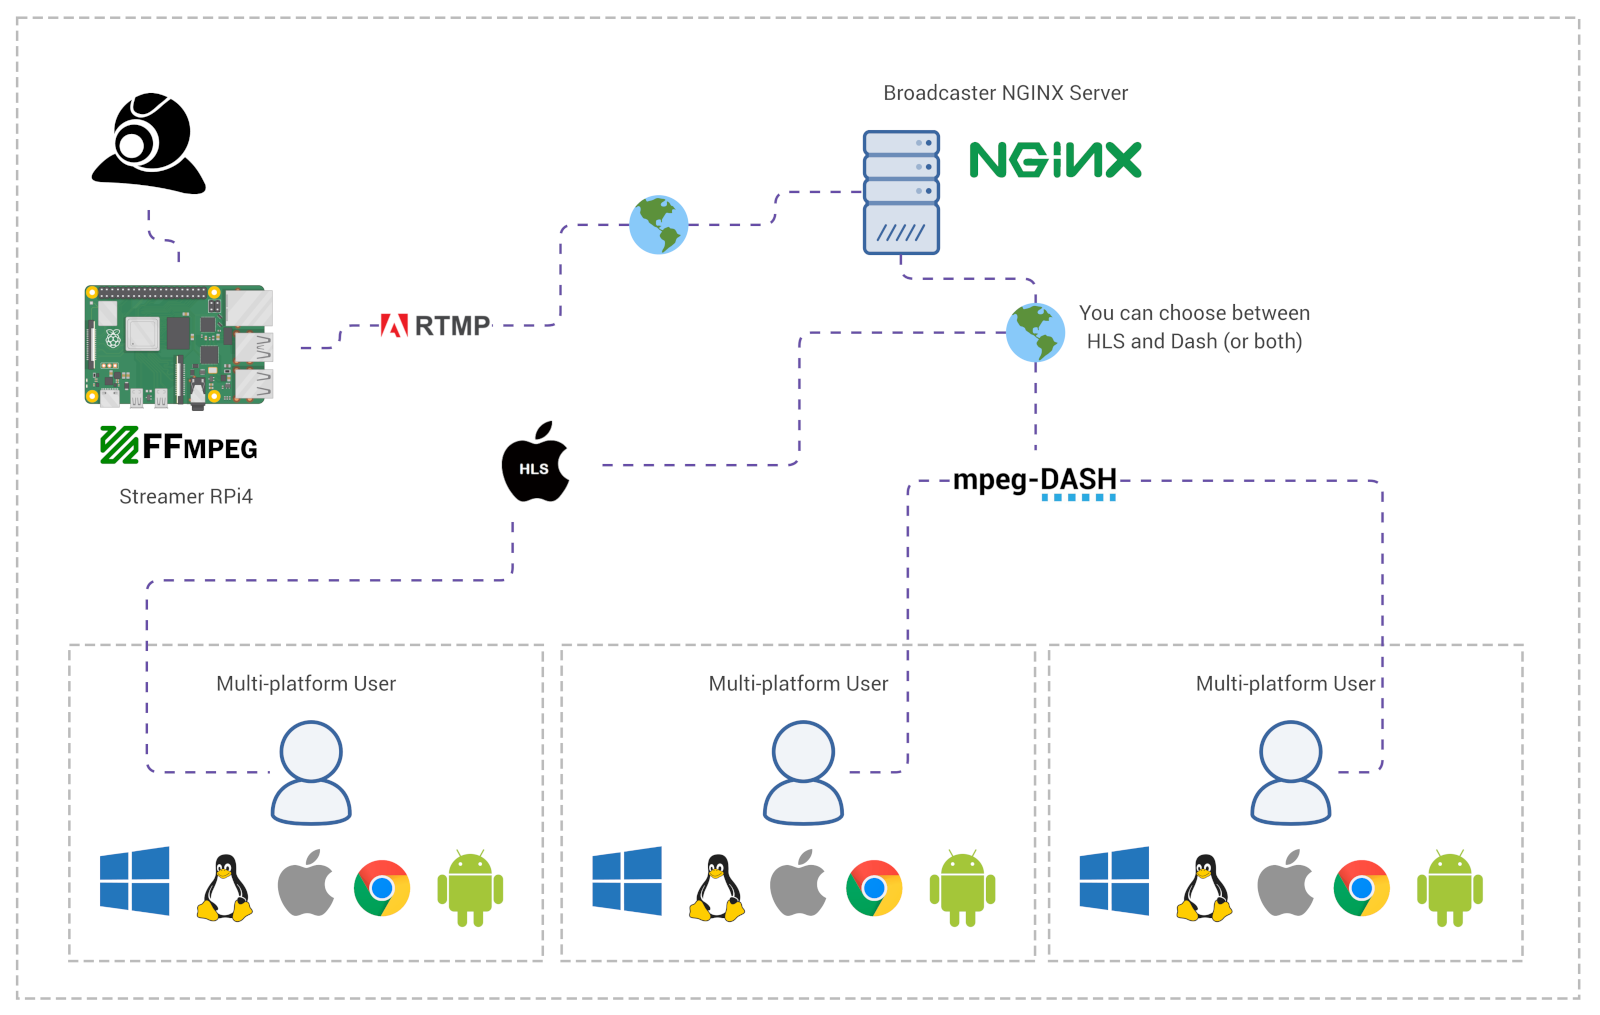
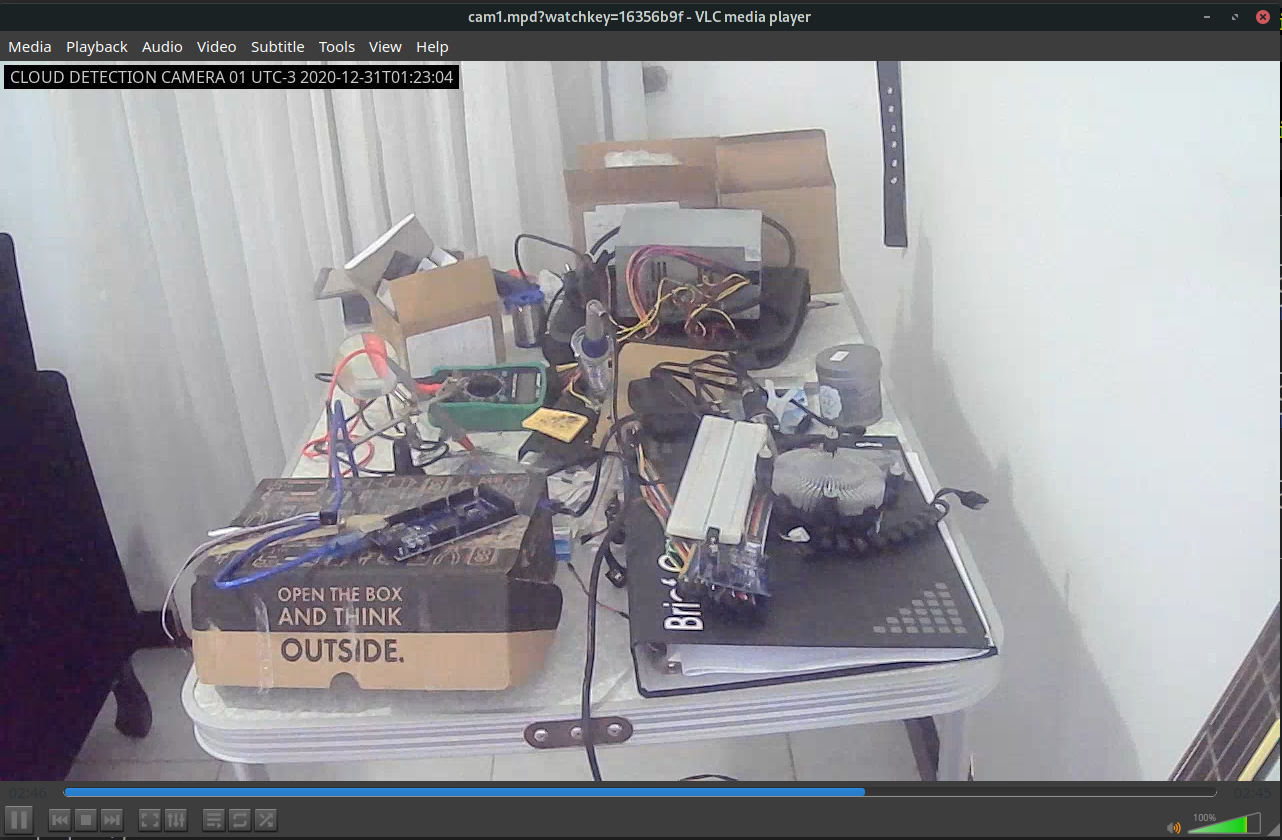

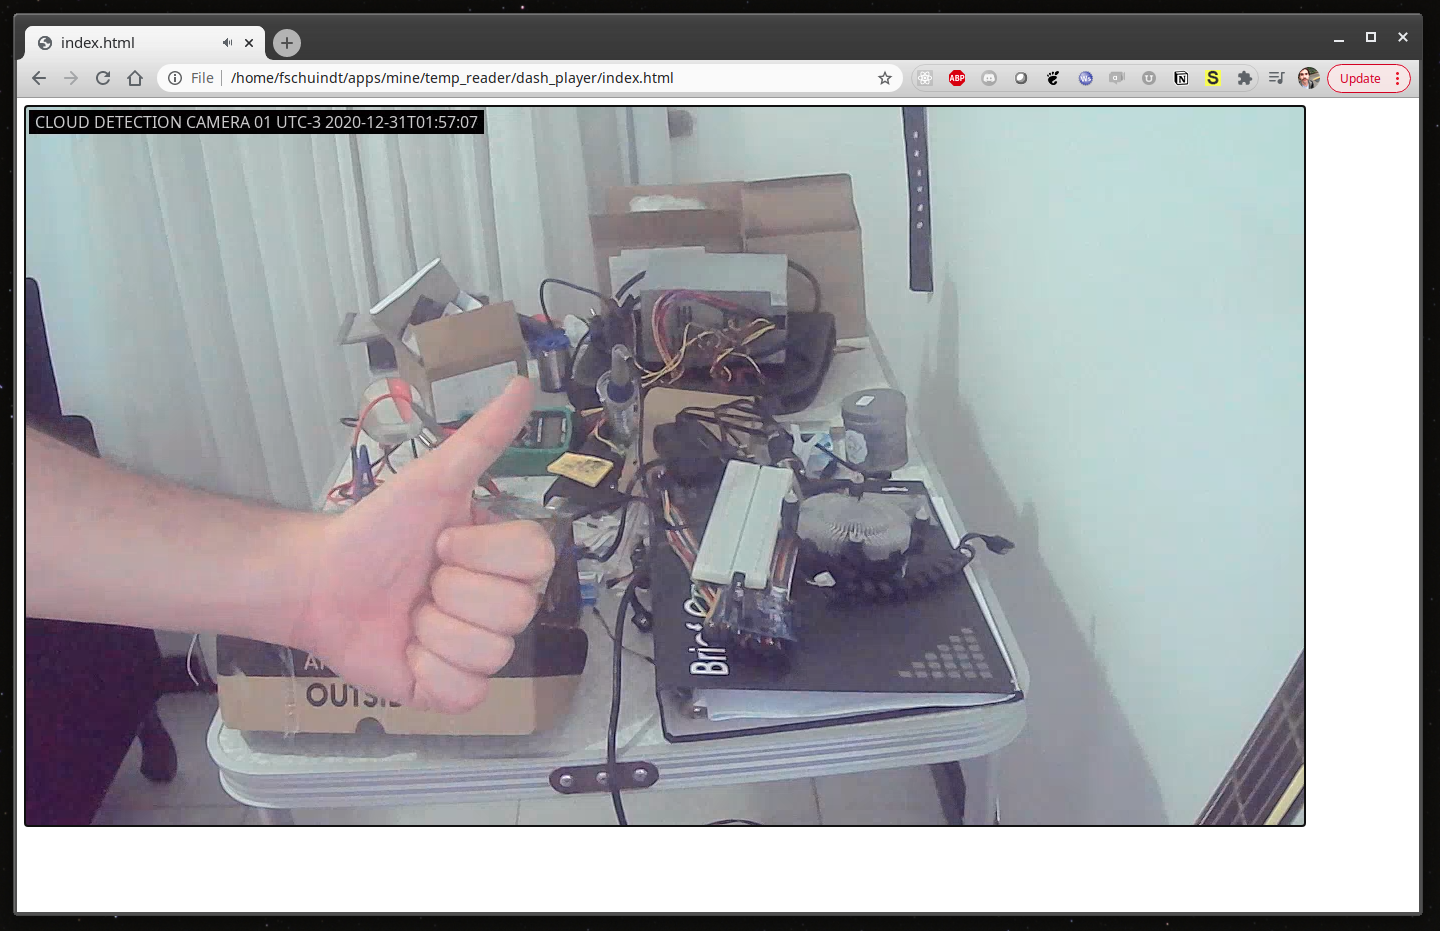


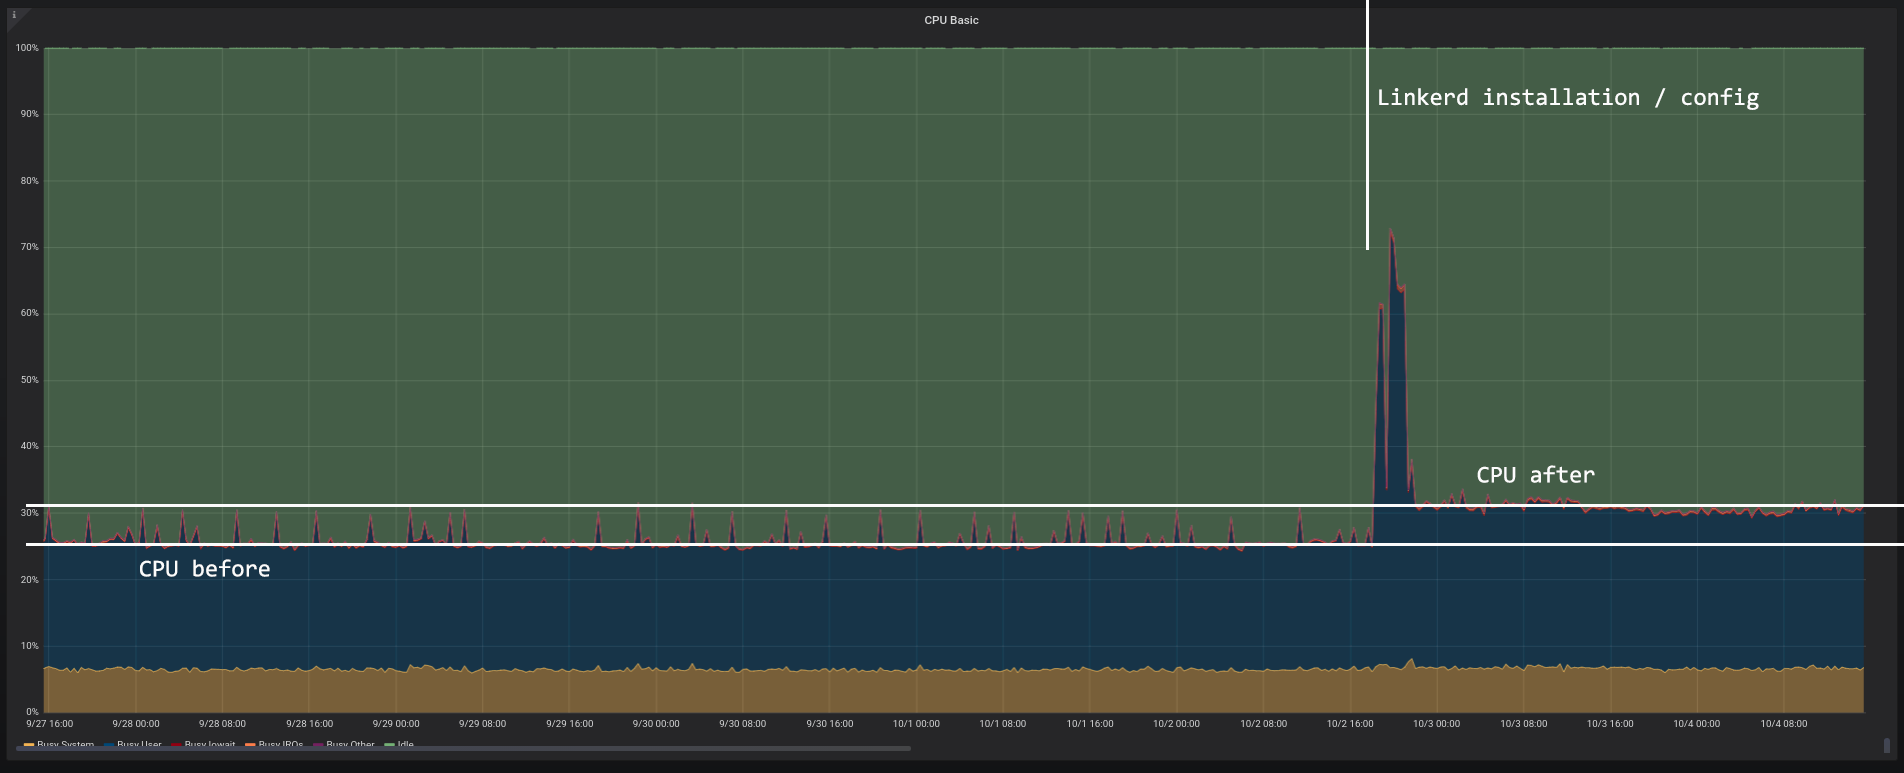


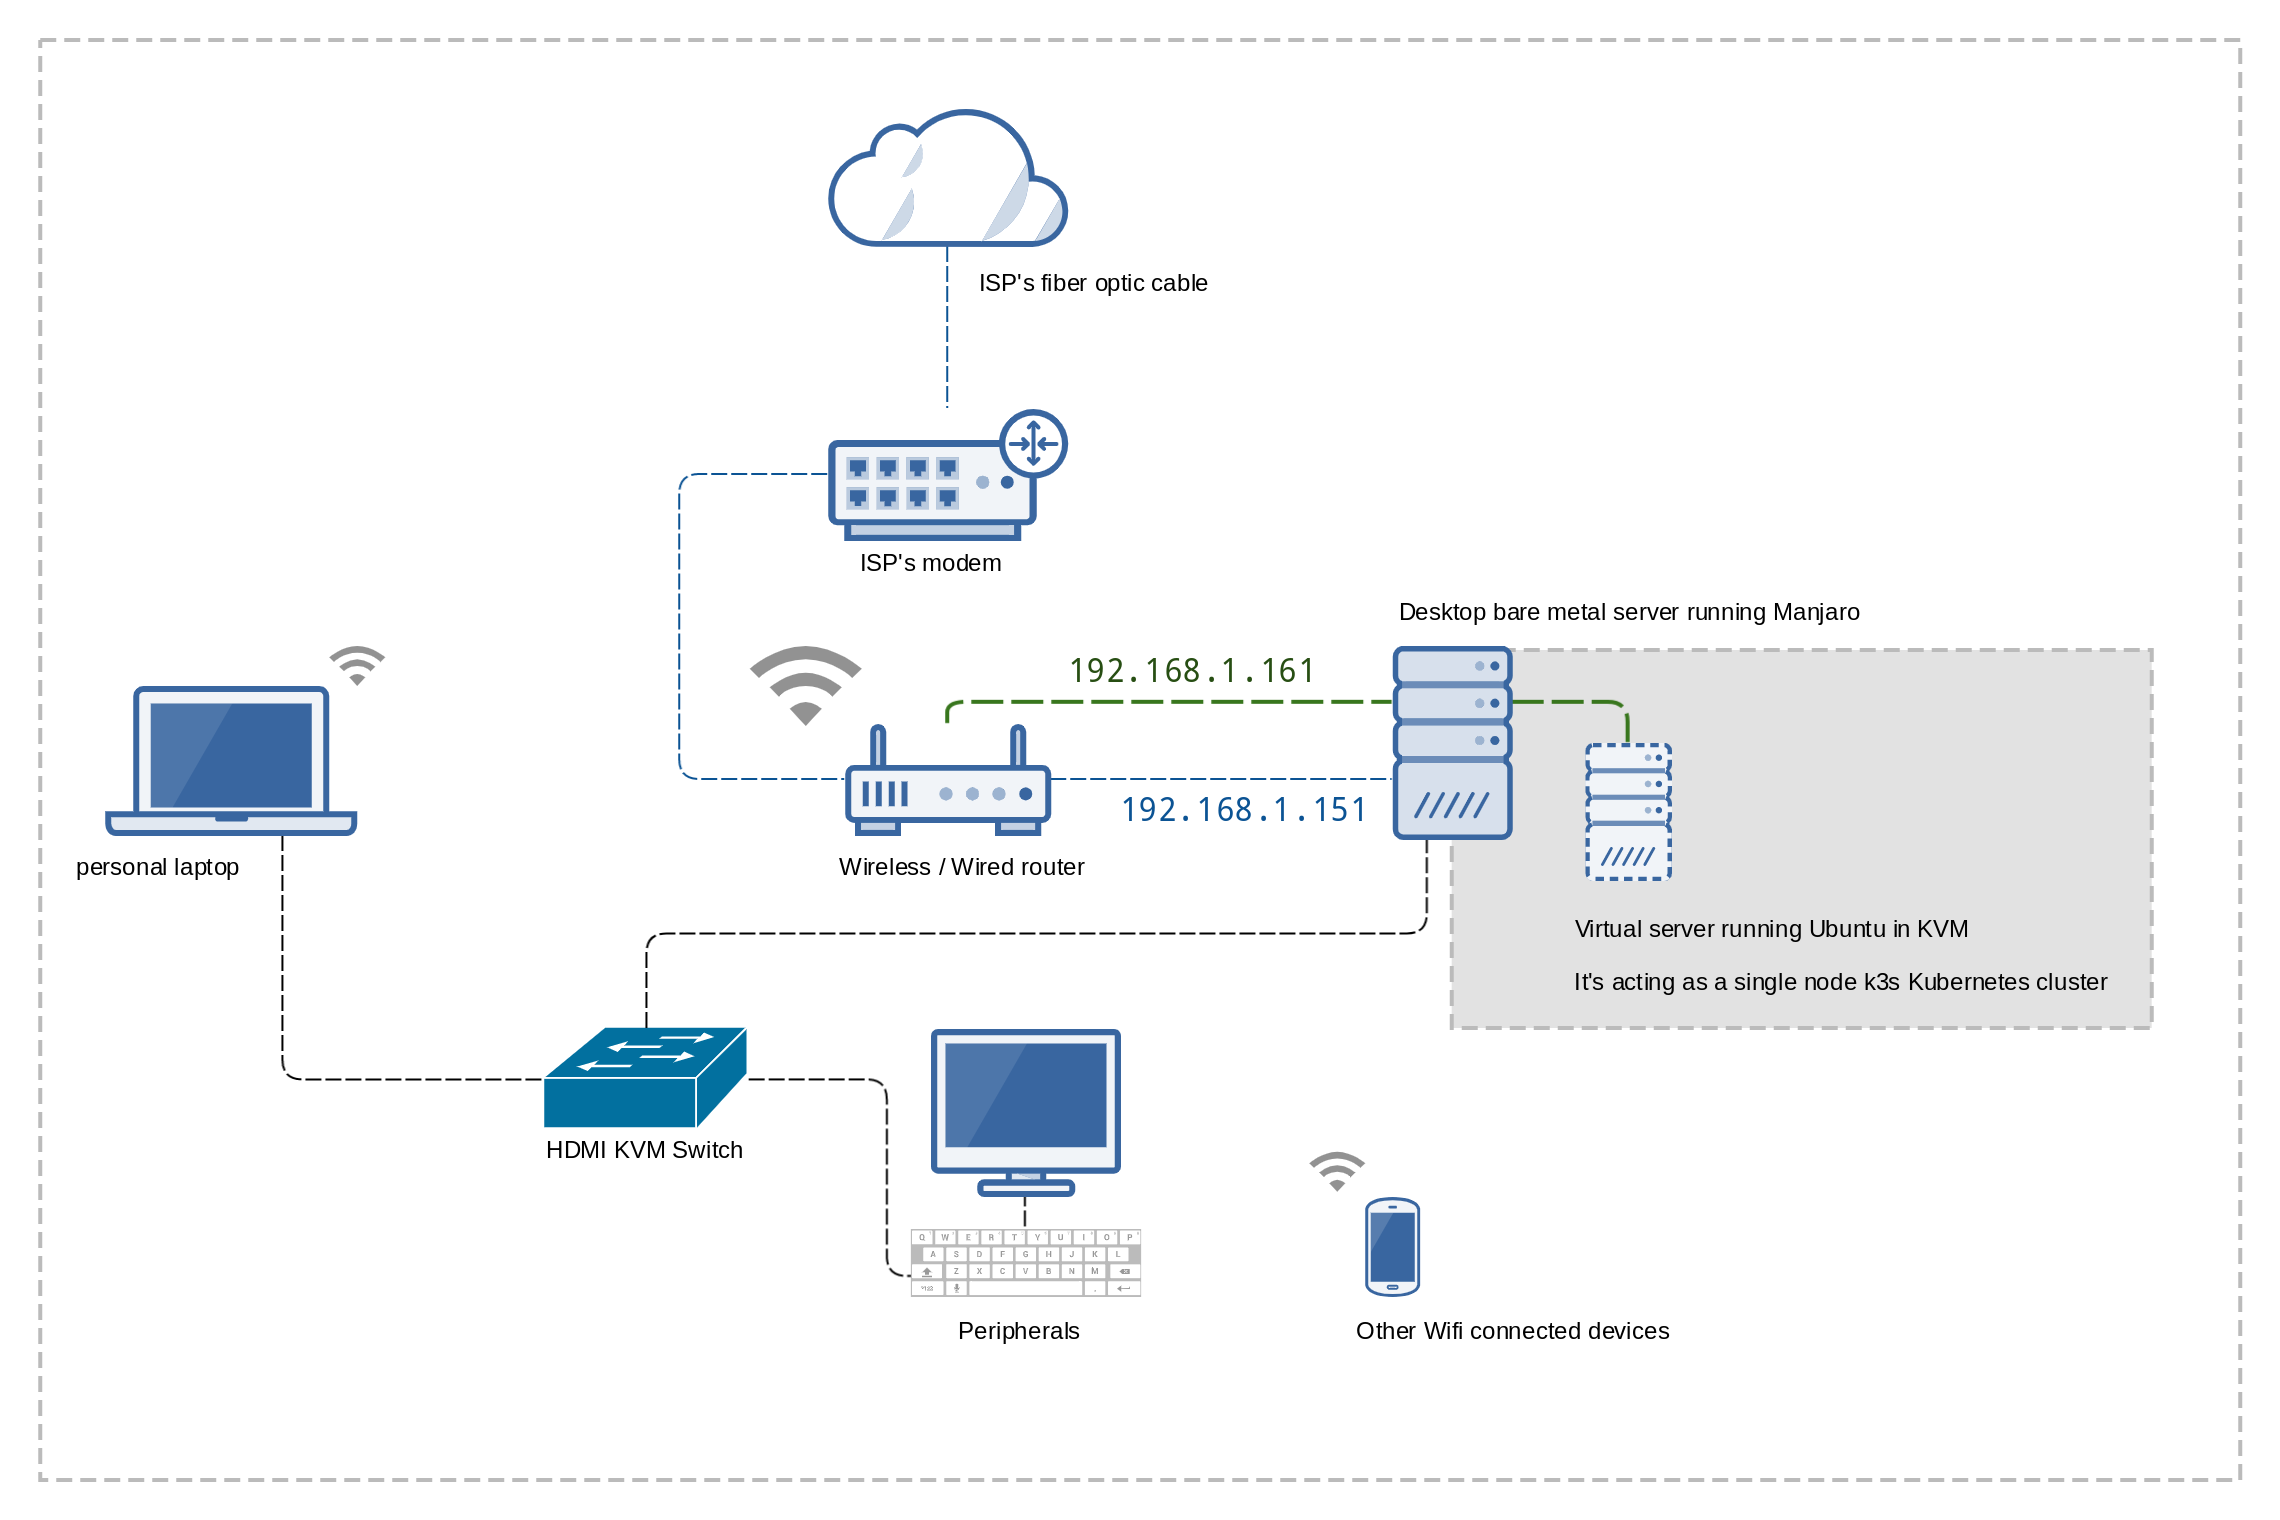
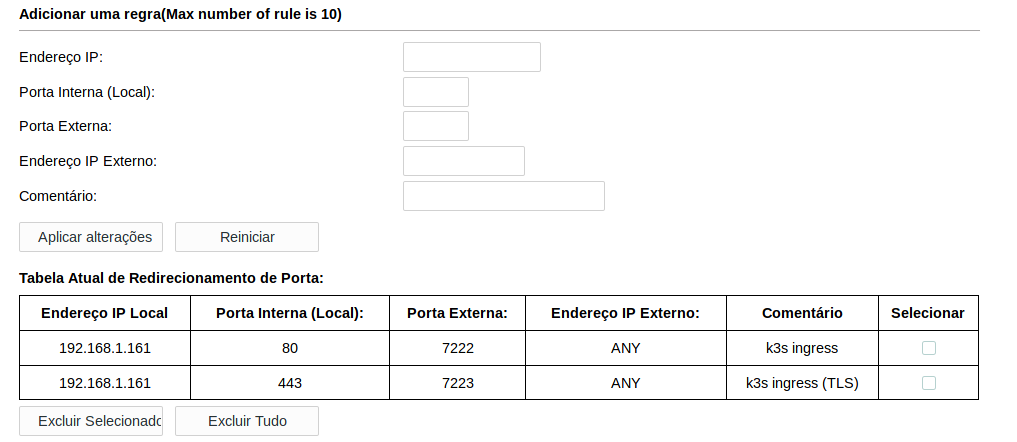


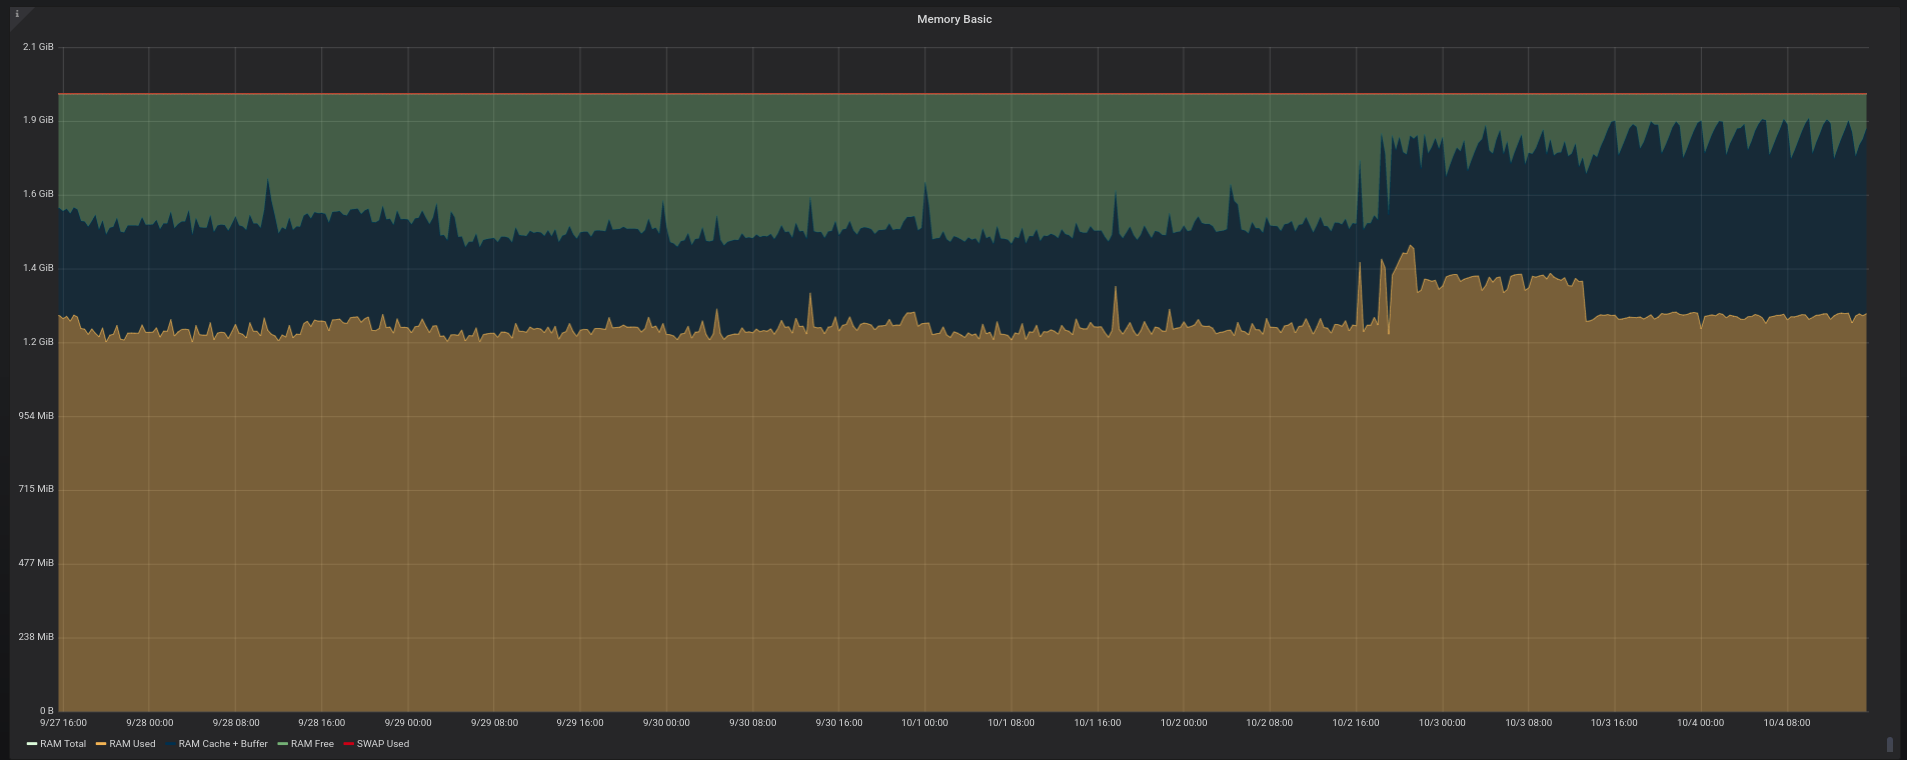
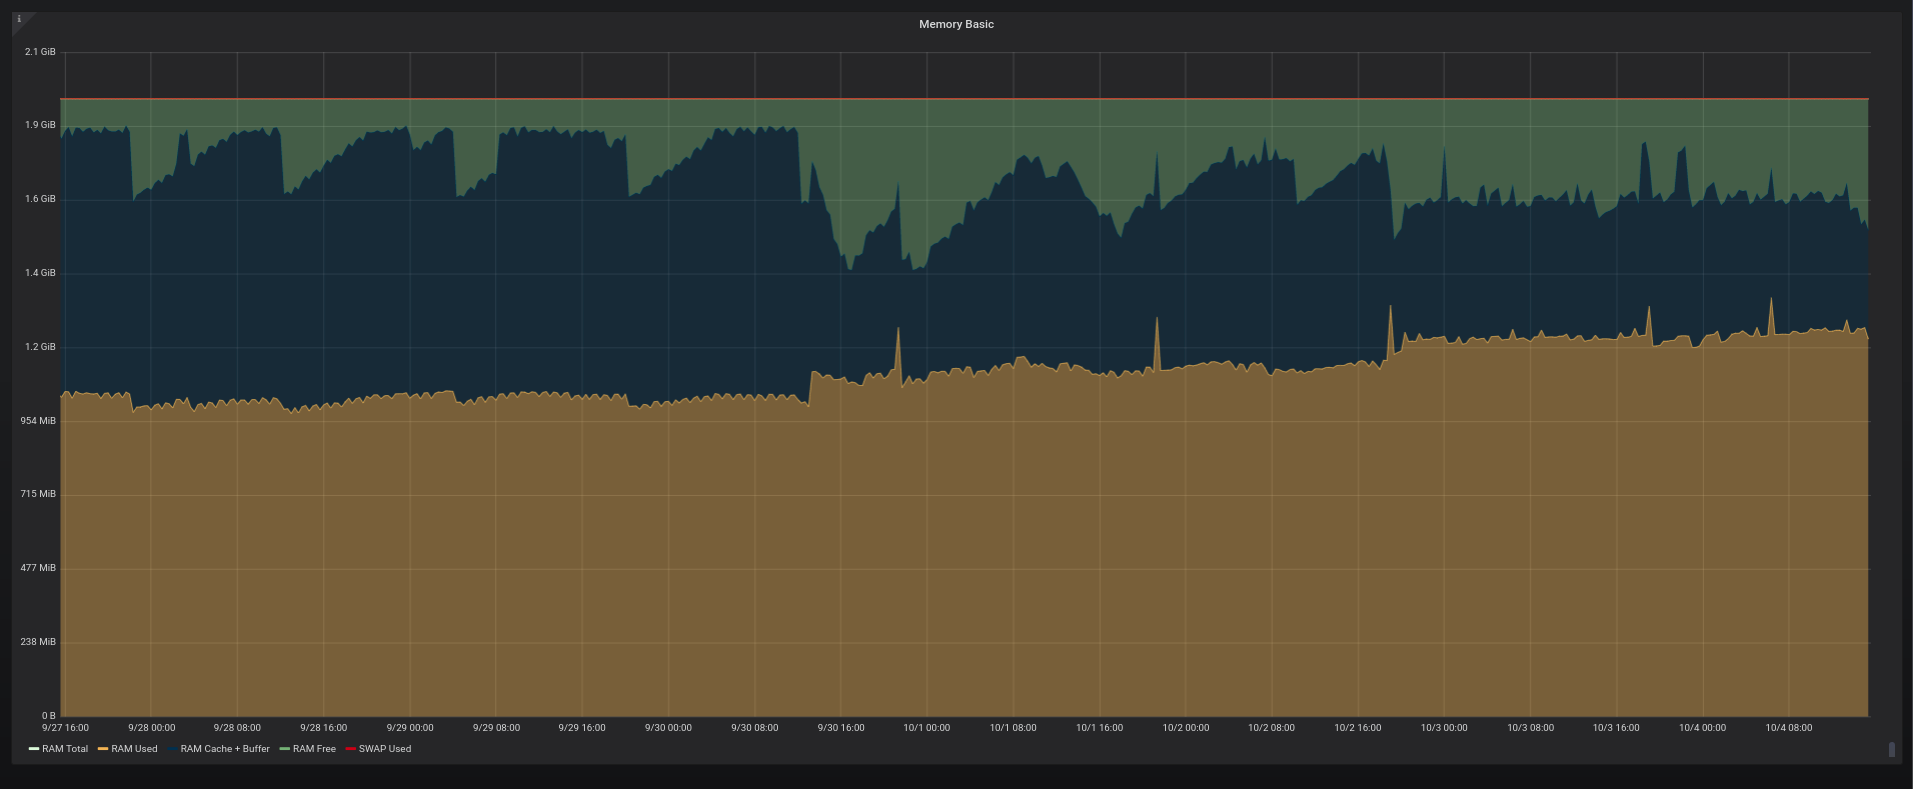
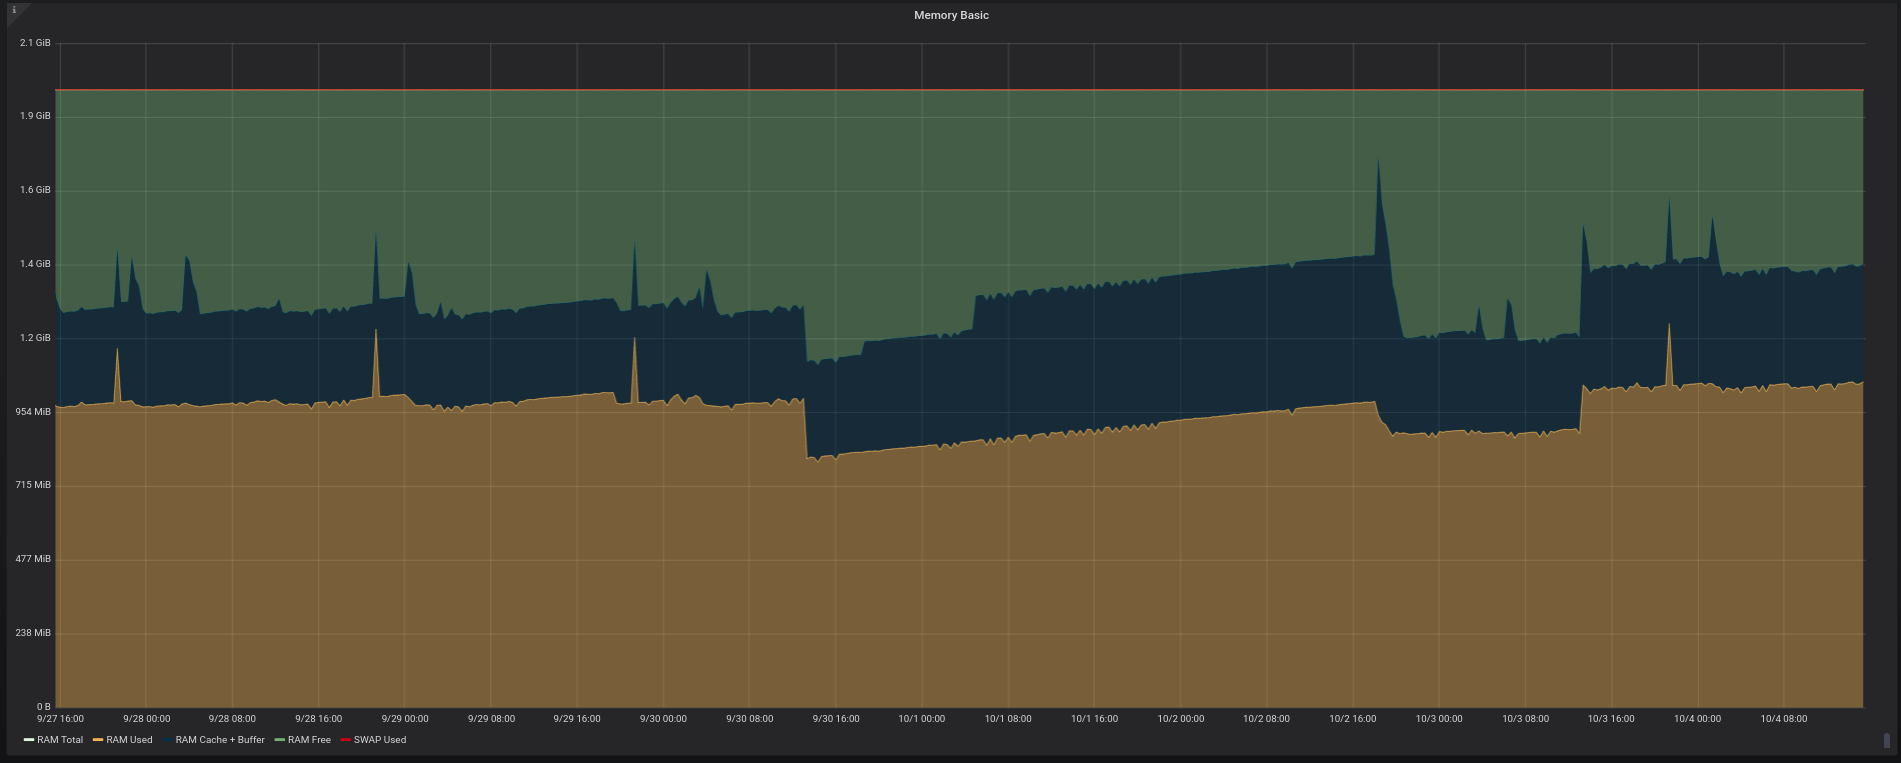